Epson tmu375 User Manual - Page 24
Installing the Ribbon Cassette, the ribbon - ribbons
 |
View all Epson tmu375 manuals
Add to My Manuals
Save this manual to your list of manuals |
Page 24 highlights
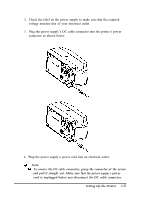
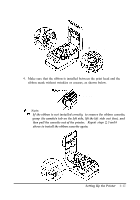
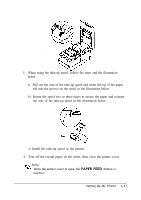
Installing the Ribbon Cassette A CAUTIONS: Never turn the ribbon cassette's knob in the opposite direction of the arrow marked on the cassette; otherwise the ribbon cassette may be damaged. Be sure the printer is not receiving data when you replace a ribbon cassette; otherwise data may be lost. * Note: % Use the EPSON ERC-38 ribbon cassette for your printer. 1. Turn on the printer and open the printer cover. 2. Turn the ribbon cassette's knob two or three times in the direction of the arrow, to take up any slack in the ribbon. 3 times 3. Insert the ribbon in the position as the illustration below and push the ribbon cassette until it clicks. Then rotate the cassette's knob two or three more times. This is necessary to place the ribbon in the correct position. 1-14 Setting Up the Printer
-
 1
1 -
2
-
3
-
4
-
5
-
6
-
7
-
8
-
9
-
10
-
11
-
12
-
13
-
14
-
15
-
16
-
17
-
18
-
 19
19 -
 20
20 -
 21
21 -
 22
22 -
 23
23 -
 24
24 -
 25
25 -
 26
26 -
 27
27 -
 28
28 -
 29
29 -
30
-
31
-
32
-
33
-
34
-
35
-
36
-
37
-
38
-
39
-
40
-
41
-
42
-
43
-
44
-
45
-
46
-
47
-
48
-
49
-
50
-
51
-
52
-
53
-
54
-
55
-
56
-
57
-
58
-
59
-
60
-
61
-
62
-
63
-
64
-
65
-
66
-
67
-
68
-
69
-
70
-
71
-
72
 |
 |
