Epson tmu375 User Manual - Page 30
Setting the DIP Switches, the printer, while, removing the DIP switch cover, prevent, electrical short
 |
View all Epson tmu375 manuals
Add to My Manuals
Save this manual to your list of manuals |
Page 30 highlights
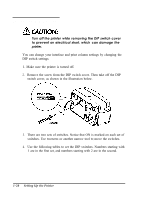
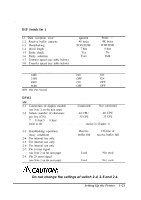
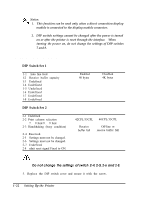
Setting the DIP Switches Turn off the printer while removing the DIP switch cover to prevent an electrical short, which can damage the printer. You can change your interface and print column settings by changing the DIP switch settings. 1. Make sure the printer is turned off. 2. Remove the screw from the DIP switch cover. Then take off the DIP switch cover, as shown in the illustration below. 3. There are two sets of switches. Notice that ON is marked on each set of switches. Use tweezers or another narrow tool to move the switches. 4. Use the following tables to set the DIP switches. Numbers starting with 1 are in the first set, and numbers starting with 2 are in the second. 1-20 Setting Up the Printer
-
 1
1 -
2
-
3
-
4
-
5
-
6
-
7
-
8
-
9
-
10
-
11
-
12
-
13
-
14
-
15
-
16
-
17
-
18
-
19
-
20
-
21
-
22
-
23
-
24
-
 25
25 -
 26
26 -
 27
27 -
 28
28 -
 29
29 -
 30
30 -
 31
31 -
 32
32 -
 33
33 -
 34
34 -
 35
35 -
36
-
37
-
38
-
39
-
40
-
41
-
42
-
43
-
44
-
45
-
46
-
47
-
48
-
49
-
50
-
51
-
52
-
53
-
54
-
55
-
56
-
57
-
58
-
59
-
60
-
61
-
62
-
63
-
64
-
65
-
66
-
67
-
68
-
69
-
70
-
71
-
72
 |
 |

Setting the DIP Switches
Turn
off
the printer
while
removing the DIP switch cover
to
prevent
an
electrical short,
which
can damage the
printer.
You can change your interface and print column settings by changing
the
DIP switch settings.
1. Make sure the printer is turned off.
2.
Remove the screw from the DIP switch cover. Then take off the DIP
switch cover, as shown in the illustration below.
3.
There are two sets of switches. Notice that ON is marked on each set of
switches. Use tweezers or another narrow tool to move the switches.
4.
Use the following tables to set the DIP switches. Numbers starting with
1 are in the first set, and numbers starting with 2 are in the second.
1-20
Setting Up the Printer