Garmin DriveSmart 66 Owners Manual - Page 10
Mounting and Powering the Garmin DriveSmart 86 Device in Your Vehicle
 |
View all Garmin DriveSmart 66 manuals
Add to My Manuals
Save this manual to your list of manuals |
Page 10 highlights
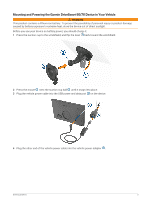
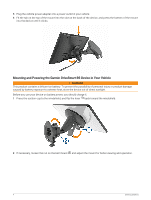
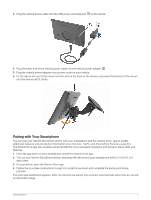
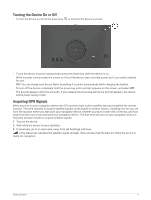
5 Plug the vehicle power adapter into a power outlet in your vehicle. 6 Fit the tab on the top of the mount into the slot on the back of the device, and press the bottom of the mount into the device until it clicks. Mounting and Powering the Garmin DriveSmart 86 Device in Your Vehicle WARNING This product contains a lithium-ion battery. To prevent the possibility of personal injury or product damage caused by battery exposure to extreme heat, store the device out of direct sunlight. Before you use your device on battery power, you should charge it. 1 Press the suction cup to the windshield, and flip the lever back toward the windshield. 2 If necessary, loosen the nut on the ball mount and adjust the mount for better viewing and operation. 4 Getting Started
-
 1
1 -
2
-
3
-
4
-
 5
5 -
 6
6 -
 7
7 -
 8
8 -
 9
9 -
 10
10 -
 11
11 -
 12
12 -
 13
13 -
 14
14 -
 15
15 -
16
-
17
-
18
-
19
-
20
-
21
-
22
-
23
-
24
-
25
-
26
-
27
-
28
-
29
-
30
-
31
-
32
-
33
-
34
-
35
-
36
-
37
-
38
-
39
-
40
-
41
-
42
-
43
-
44
-
45
-
46
-
47
-
48
-
49
-
50
-
51
-
52
-
53
-
54
-
55
-
56
-
57
-
58
-
59
-
60
-
61
-
62
-
63
-
64
 |
 |
