Garmin DriveSmart 66 Owners Manual - Page 49
Viewing photoLive Traffic Cameras on the Map, Saving a Traffic Camera, Wireless Cameras
 |
View all Garmin DriveSmart 66 manuals
Add to My Manuals
Save this manual to your list of manuals |
Page 49 highlights
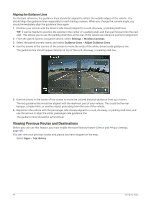
Viewing photoLive Traffic Cameras on the Map The photoLive map tool shows traffic cameras from the road ahead of you. 1 From the map, select > photoLive. The device shows the live image from the nearest traffic camera on the road ahead, along with the distance to the camera. When you pass the camera, the device loads the live image of the next camera on the road. 2 If no cameras are found for the road, select Find Cameras to view or save nearby traffic cameras (optional). Saving a Traffic Camera 1 Select Apps > photoLive. 2 Select Touch to Add. 3 Select a traffic camera. 4 Select Save. Wireless Cameras Your device can display the video feed from one or more connected wireless cameras. Pairing the Camera with a Garmin Navigation Device You can pair the camera with a compatible Garmin navigation device. For more information about compatible Garmin devices, go to the product page at garmin.com/bc40. 1 Update your navigation device to the latest software. Your device may not support the BC 40 camera without the latest software. For more information about updating the software, see the owner's manual for your navigation device. 2 Install batteries in the camera. The camera enters pairing mode automatically, and the LED flashes blue while the camera is in pairing mode. The camera remains in pairing mode for two minutes. If pairing mode expires, you can remove and reinstall the batteries. 3 Bring the compatible Garmin navigation device outside your vehicle and within 1.5 m (5 ft.) of the camera, and turn on the navigation device. The device detects your camera automatically and prompts you to pair with it. 4 Select Yes. TIP: If the navigation device does not detect the camera automatically, you can select Settings > Wireless Cameras > Add New Camera to pair with it manually. The device pairs with your camera. 5 Enter a name for the camera (optional). You should use a descriptive name that clearly identifies the location of the camera. 6 Select Done. Viewing the Wireless Camera WARNING This device is intended to enhance situational awareness when used properly. If used improperly, you could become distracted by the display, which could lead to an accident causing serious personal injury or death. Always view the display at a glance when the vehicle is in motion to avoid becoming distracted. From the home screen or the map, select . Using the Apps 43
-
 1
1 -
2
-
3
-
4
-
5
-
6
-
7
-
8
-
9
-
10
-
11
-
12
-
13
-
14
-
15
-
16
-
17
-
18
-
19
-
20
-
21
-
22
-
23
-
24
-
25
-
26
-
27
-
28
-
29
-
30
-
31
-
32
-
33
-
34
-
35
-
36
-
37
-
38
-
39
-
40
-
41
-
42
-
43
-
 44
44 -
 45
45 -
 46
46 -
 47
47 -
 48
48 -
 49
49 -
 50
50 -
 51
51 -
 52
52 -
 53
53 -
 54
54 -
55
-
56
-
57
-
58
-
59
-
60
-
61
-
62
-
63
-
64
 |
 |
