GE PT960DPBB Owners Manual - Page 21
Control Lockout, To Set the Kitchen Timer
 |
View all GE PT960DPBB manuals
Add to My Manuals
Save this manual to your list of manuals |
Page 21 highlights
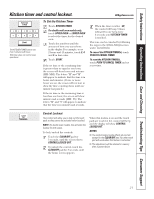
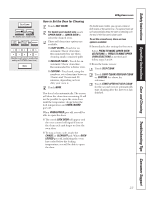
Safety Instructions Operating Instructions Care and Cleaning Troubleshooting Tips Consumer Support Kitchen timer and control lockout. GEAppliances.com KITCHEN TIMER 1 2 3 4 5 6 7 8 9 0 START The KITCHEN TIMER can be set from 1 minute to 24 hours. This timer does not control oven operations. To Set the Kitchen Timer Touch KITCHEN TIMER. For double wall oven models only, touch UPPER OVEN or LOWER OVEN to select the timer for the desired oven. Touch the numbers until the amount of time you want shows in the display. For example, to set 2 hours and 45 minutes, touch 2, 4 and 5 in that order. Touch START. If the set time or the remaining time is greater than or equal to one hour, the screen will show hours and minutes [HH: MM]. The letters "H" and "M" will appear to indicate that the time is in hours and minutes. (If one or more hours was set, the screen will not start to show the time counting down until one minute has passed.) If the set time or the remaining time is less than one hour, the screen will show minutes and seconds [MM : SS]. The letters "M" and "S" will appear to indicate that the time is in minutes and seconds. When the timer reaches :00, the control will beep 3 times followed by one beep every 6 seconds until KITCHEN TIMER is touched. The tone can be canceled by following the steps in the Options-Settings section under Sound/Volume. To cancel the KITCHEN TIMER(s), touch PUSH TO CANCEL TIMER. To reset the KITCHEN TIMER(s), touch PUSH TO CANCEL TIMER and set a new time. Control Lockout CLEAR OFF Your control will allow you to lock out the touch When this feature is on and the touch pads so they cannot be activated when touched. pads are touched, the control will beep NOTE: On double oven models, this activates the feature for both ovens. and the display will show CONTROL LOCKED OUT. To lock/unlock the controls: Touch the CLEAR/OFF pad for 3 seconds, until the screen shows CONTROL LOCKED OUT. To unlock the control, touch the NOTES: s The control lockout mode affects all controls except for the CLEAR/OFF pad. No other touch pad will work when this feature is activated. s The adjustment will be retained in memory after a power failure. CLEAR/OFF pad for 3 seconds, until the home screen appears. 21
-
 1
1 -
2
-
3
-
4
-
5
-
6
-
7
-
8
-
9
-
10
-
11
-
12
-
13
-
14
-
15
-
 16
16 -
 17
17 -
 18
18 -
 19
19 -
 20
20 -
 21
21 -
 22
22 -
 23
23 -
 24
24 -
 25
25 -
 26
26 -
27
-
28
-
29
-
30
-
31
-
32
-
33
-
34
-
35
-
36
-
37
-
38
-
39
-
40
-
41
-
42
-
43
-
44
-
45
-
46
-
47
-
48
-
49
-
50
-
51
-
52
-
53
-
54
-
55
-
56
-
57
-
58
-
59
-
60
-
61
-
62
-
63
-
64
-
65
-
66
-
67
-
68
-
69
-
70
-
71
-
72
-
73
-
74
-
75
-
76
-
77
-
78
-
79
-
80
-
81
-
82
-
83
-
84
-
85
-
86
-
87
-
88
-
89
-
90
-
91
-
92
-
93
-
94
-
95
-
96
-
97
-
98
-
99
-
100
-
101
-
102
-
103
-
104
-
105
-
106
-
107
-
108
-
109
-
110
-
111
-
112
-
113
-
114
-
115
-
116
-
117
-
118
-
119
-
120
-
121
-
122
-
123
-
124
-
125
-
126
-
127
-
128
-
129
-
130
-
131
-
132
-
133
-
134
-
135
-
136
 |
 |
