GE PT960DPBB Owners Manual - Page 29
Cook and Hold Option, Dehydrate Option, Cook and Hold, Dehydrate
 |
View all GE PT960DPBB manuals
Add to My Manuals
Save this manual to your list of manuals |
Page 29 highlights
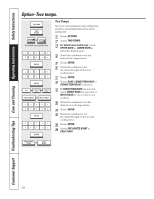
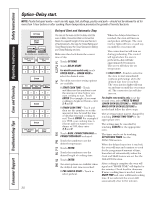
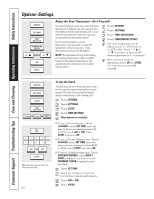
Safety Instructions Operating Instructions Care and Cleaning Troubleshooting Tips Consumer Support Options-Cook & hold and dehydrate. GEAppliances.com COOK & HOLD Cook and Hold Your control has a cook and hold feature that keeps cooked foods warm for up to 3 hours after Timed Baking or Timed Roasting is finished. NOTE: This feature can only be programmed to work with Timed Baking or Timed Roasting. (See the Using the timed baking or timed roasting features section.) After Timed Baking or Timed Roasting has automatically stopped and the MORE TIME option ends, the programmed cook and hold will automatically start. There are two ways to activate this feature for use after Timed Baking or Timed Roasting: s After setting a Timed Bake or Timed Roast: Touch ADD BAKE OPTION, ADD CONV BAKE OPTION or ADD ROAST OPTION depending on the cooking mode you are setting. Touch COOK & HOLD. Touch OK. Touch PRE-HEATED START or COLD START. s Set using OPTIONS: Touch OPTIONS. Touch COOK & HOLD. For double oven models only, touch UPPER OVEN or LOWER OVEN to select the desired oven. Touch OK. Touch BAKE, CONVECTION BAKE, CONVECTION ROAST or TWO TEMPS. Touch the numbers to enter the temperature(s) and the time(s). Touch ENTER. Touch PRE-HEATED START or COLD START. Place the magnetic end onto the upper inside surface of the oven door. Close the door against the doorstop. OPTIONS DEHYDRATE UPPER OVEN OR LOWER OVEN ENTER START Dehydrate Dehydration (Drying) is a method of preserving fruits, vegetables, herbs and meats by removing moisture so bacteria, yeast and mold cannot grow and spoil the food. The oven uses an automatic set temperature and the convection fan to remove moisture from the foods to dry and preserve them. Note that over 12 hours may be required to dry some foods. Accurate and complete information on basic food drying is available from your local cooperative extension service office. To locate this office in your area, look in your telephone directory for the county government listings under your county name. During dehydration, your oven door must remain partially open to allow for air circulation and moisture removal. Use the dehydration doorstop, which is included with your oven, to hold the door open for dehydration. Open the oven door. Place the magnetic end of the doorstop onto the upper inside surface of the oven door. Close the oven door, allowing the door to rest against the doorstop. Touch OPTIONS. Touch DEHYDRATE. For double oven models only, touch UPPER OVEN or LOWER OVEN to select the desired oven. Enter the temperature (max. 200°F). Touch ENTER. Touch START. NOTES: s Store the doorstop in a safe place when not in use. s Use only the doorstop provided with your oven and only use the doorstop while dehydrating. s Do not store the doorstop in the oven. s Remember that the proper preparation, treatment and storage of food are essential for the quality and safety of dried food. Dehydrating Helpful Tips: s Multiple racks of food can be dried at one time. s Drying time will vary depending on several factors: • number of racks of food • amount of food on each rack • size, shape and thickness of food • type of drying trays used s Use food preservation resources, such as your local cooperative extension service, as a guide for selecting food-safe drying trays. To order a replacement doorstop, call our National Parts Center at 800.626.2002 and reference WB08T10024. 29
-
 1
1 -
2
-
3
-
4
-
5
-
6
-
7
-
8
-
9
-
10
-
11
-
12
-
13
-
14
-
15
-
16
-
17
-
18
-
19
-
20
-
21
-
22
-
23
-
 24
24 -
 25
25 -
 26
26 -
 27
27 -
 28
28 -
 29
29 -
 30
30 -
 31
31 -
 32
32 -
 33
33 -
 34
34 -
35
-
36
-
37
-
38
-
39
-
40
-
41
-
42
-
43
-
44
-
45
-
46
-
47
-
48
-
49
-
50
-
51
-
52
-
53
-
54
-
55
-
56
-
57
-
58
-
59
-
60
-
61
-
62
-
63
-
64
-
65
-
66
-
67
-
68
-
69
-
70
-
71
-
72
-
73
-
74
-
75
-
76
-
77
-
78
-
79
-
80
-
81
-
82
-
83
-
84
-
85
-
86
-
87
-
88
-
89
-
90
-
91
-
92
-
93
-
94
-
95
-
96
-
97
-
98
-
99
-
100
-
101
-
102
-
103
-
104
-
105
-
106
-
107
-
108
-
109
-
110
-
111
-
112
-
113
-
114
-
115
-
116
-
117
-
118
-
119
-
120
-
121
-
122
-
123
-
124
-
125
-
126
-
127
-
128
-
129
-
130
-
131
-
132
-
133
-
134
-
135
-
136
 |
 |
