GE PT960DPBB Owners Manual - Page 32
Option Settings, Adjust the Oven Thermostat-Do It Yourself, To Set the Clock
 |
View all GE PT960DPBB manuals
Add to My Manuals
Save this manual to your list of manuals |
Page 32 highlights
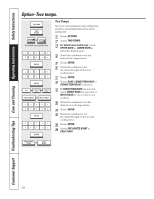
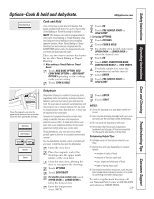
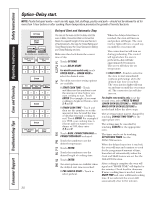
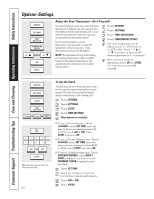
Consumer Support Troubleshooting Tips Care and Cleaning Operating Instructions Safety Instructions Options-Settings. OPTIONS SETTINGS TEMP SELECTION TEMPERATURE OFFSET +1˚ AND/OR -1˚ OK DONE Adjust the Oven Thermostat-Do It Yourself! You may find that your new oven cooks differently than the one it replaced. Use your new oven for a few weeks to become more familiar with it. If you still think your new oven is too hot or too cold, you can adjust the thermostat yourself. Do not use thermometers, such as those found in grocery stores, to check the temperature setting of your oven. These thermometers may vary 20-40 degrees. NOTE: This adjustment will only affect baking and roasting temperatures; it does not affect broiling or self-cleaning temperatures. The adjustment will be retained in memory after a power failure. Touch OPTIONS. Touch SETTINGS. Touch TEMP SELECTIONS. Touch TEMPERATURE OFFSET. The oven temperature can be adjusted up to (+) 35°F hotter or (-) 35°F cooler. Touch + 1° v or - 1° w to increase or decrease the offset temperature in 1° increments. When you have made the adjustment, touch OK and DONE. Use your oven as you would normally. OPTIONS SETTINGS CLOCK TIME SETTINGS 12 HOURS OR 24 HOURS OR DAYLIGHT SAVINGS SET TIME 1 2 3 4 5 6 7 8 9 0 AM OR PM ENTER Make sure the clock is set to the correct time of day. 32 To Set the Clock The clock must be set to the correct time of day for the automatic oven timing functions to work properly. The time of day cannot be changed during a timed baking or self-cleaning cycle. Touch OPTIONS. Touch SETTINGS. Touch CLOCK. Touch TIME SETTINGS. Three options are available: s To set a 12 hour day time: Touch 12 HOURS , touch SET TIME, enter the time in hours and minutes from 1:00 to 12:59, touch AM or PM, touch START and touch OK. s To set a 24 hour (military) time: Touch 24 HOURS, touch SET TIME, enter the time in hours and minutes from 00:01 to 23:59, touch START and touch OK. s To set for daylight savings time: Touch DAYLIGHT SAVINGS, touch BACK 1 HOUR to fall back one hour or touch FORWARD 1 HOUR to spring forward one hour. Touch SET TIME. Touch the numbers to enter the current time in hours and minutes. Touch AM or PM. Touch ENTER.
-
 1
1 -
2
-
3
-
4
-
5
-
6
-
7
-
8
-
9
-
10
-
11
-
12
-
13
-
14
-
15
-
16
-
17
-
18
-
19
-
20
-
21
-
22
-
23
-
24
-
25
-
26
-
 27
27 -
 28
28 -
 29
29 -
 30
30 -
 31
31 -
 32
32 -
 33
33 -
 34
34 -
 35
35 -
 36
36 -
 37
37 -
38
-
39
-
40
-
41
-
42
-
43
-
44
-
45
-
46
-
47
-
48
-
49
-
50
-
51
-
52
-
53
-
54
-
55
-
56
-
57
-
58
-
59
-
60
-
61
-
62
-
63
-
64
-
65
-
66
-
67
-
68
-
69
-
70
-
71
-
72
-
73
-
74
-
75
-
76
-
77
-
78
-
79
-
80
-
81
-
82
-
83
-
84
-
85
-
86
-
87
-
88
-
89
-
90
-
91
-
92
-
93
-
94
-
95
-
96
-
97
-
98
-
99
-
100
-
101
-
102
-
103
-
104
-
105
-
106
-
107
-
108
-
109
-
110
-
111
-
112
-
113
-
114
-
115
-
116
-
117
-
118
-
119
-
120
-
121
-
122
-
123
-
124
-
125
-
126
-
127
-
128
-
129
-
130
-
131
-
132
-
133
-
134
-
135
-
136
 |
 |
