GE PT960DPBB Owners Manual - Page 37
Care and cleaning of the oven., Safety Instructions, Operating Instructions, Troubleshooting Tips
 |
View all GE PT960DPBB manuals
Add to My Manuals
Save this manual to your list of manuals |
Page 37 highlights
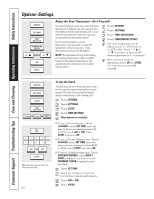
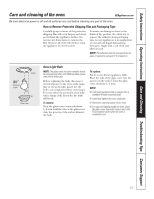
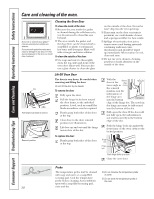
Safety Instructions Operating Instructions Care and Cleaning Troubleshooting Tips Consumer Support Care and cleaning of the oven. GEAppliances.com Be sure electrical power is off and all surfaces are cool before cleaning any part of the oven. How to Remove Protective Shipping Film and Packaging Tape Carefully grasp a corner of the protective shipping film with your fingers and slowly peel it from the appliance surface. Do not use any sharp items to remove the film. Remove all of the film before using the appliance for the first time. To assure no damage is done to the finish of the product, the safest way to remove the adhesive from packaging tape on new appliances is an application of a household liquid dishwashing detergent. Apply with a soft cloth and allow to soak. NOTE: The adhesive must be removed from all parts. It cannot be removed if it is baked on. Socket 31⁄2" Maximum length Bulb Tab Glass cover Oven Light Bulb NOTE: The glass cover (on some models) should be removed only when cold. Wearing latex gloves may offer a better grip. Before replacing the bulb, disconnect electrical power to the oven at the main fuse or circuit breaker panel. Let the bulb cool completely before removing it. For your safety, do not touch a hot bulb with a damp cloth. If you do, the bulb will break. To remove: Turn the glass cover counterclockwise 1/4 turn until the tabs of the glass cover clear the grooves of the socket. Remove the bulb. To replace: Put in a new 40-watt appliance bulb. Place the tabs of the glass cover into the grooves of the socket. Turn the glass cover clockwise 1/4 turn. NOTE: s A 40-watt appliance bulb is smaller than a standard 40-watt household bulb. s Install and tighten the cover clockwise. s Reconnect electrical power to the oven. s For improved lighting inside the oven, clean the glass cover frequently using a wet cloth. This should be done when the oven is completely cool. 37
-
 1
1 -
2
-
3
-
4
-
5
-
6
-
7
-
8
-
9
-
10
-
11
-
12
-
13
-
14
-
15
-
16
-
17
-
18
-
19
-
20
-
21
-
22
-
23
-
24
-
25
-
26
-
27
-
28
-
29
-
30
-
31
-
 32
32 -
 33
33 -
 34
34 -
 35
35 -
 36
36 -
 37
37 -
 38
38 -
 39
39 -
 40
40 -
 41
41 -
 42
42 -
43
-
44
-
45
-
46
-
47
-
48
-
49
-
50
-
51
-
52
-
53
-
54
-
55
-
56
-
57
-
58
-
59
-
60
-
61
-
62
-
63
-
64
-
65
-
66
-
67
-
68
-
69
-
70
-
71
-
72
-
73
-
74
-
75
-
76
-
77
-
78
-
79
-
80
-
81
-
82
-
83
-
84
-
85
-
86
-
87
-
88
-
89
-
90
-
91
-
92
-
93
-
94
-
95
-
96
-
97
-
98
-
99
-
100
-
101
-
102
-
103
-
104
-
105
-
106
-
107
-
108
-
109
-
110
-
111
-
112
-
113
-
114
-
115
-
116
-
117
-
118
-
119
-
120
-
121
-
122
-
123
-
124
-
125
-
126
-
127
-
128
-
129
-
130
-
131
-
132
-
133
-
134
-
135
-
136
 |
 |