HTC EVO Design 4G EVO DESIGN 4G USER GUIDE - Page 48
Reject an Incoming Call, Reject a Call and Send a Text Message, Visual Voicemail - parts
 |
View all HTC EVO Design 4G manuals
Add to My Manuals
Save this manual to your list of manuals |
Page 48 highlights
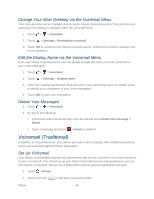
Reject an Incoming Call ► If the display is on, touch Decline. ► If the display is off, the display will come on with the Lock screen. Press and hold the Decline button and then drag it to the ring to reject and send the call to your voicemail. Reject a Call and Send a Text Message You can automatically send a default text message to a caller and reject the incoming voice call. ► Touch > Send message when you have an incoming call to send the text message. You can change the default text message by touching message while on the Phone screen. > Phone settings > Edit default Visual Voicemail Visual Voicemail gives you a quick and easy way to access your voicemail. Now you can find exactly the message you are looking for without having to listen to every voicemail message first. This new feature periodically goes out to your voicemail, and gathers the caller information from all of the current voicemails. It then populates a list with the caller name and number, along with the length of time and priority level of the voicemail message. Set Up Visual Voicemail Your device automatically transfers all unanswered calls to your voicemail, even if your device is in use or turned off. You should set up your Sprint voicemail and personal greeting as soon as your device is activated. Note: To set up your traditional voicemail box, see Set Up Voicemail. 1. Touch > > Voicemail. 2. Touch Personalize now and follow the voice prompts to: Create a password (part of standard voicemail). Record your name announcement. Record your greeting. 3. When prompted to enter information, use the onscreen dialpad to enter your numeric responses. Important: Voicemail Password - Sprint strongly recommends that you create a password when setting up your voicemail to protect against unauthorized access. Without a password, anyone who has access to your device is able to access your voicemail messages. 4. Once you have completed the setup process, return to the voicemail page (see step 1). Phone 36
-
 1
1 -
2
-
3
-
4
-
5
-
6
-
7
-
8
-
9
-
10
-
11
-
12
-
13
-
14
-
15
-
16
-
17
-
18
-
19
-
20
-
21
-
22
-
23
-
24
-
25
-
26
-
27
-
28
-
29
-
30
-
31
-
32
-
33
-
34
-
35
-
36
-
37
-
38
-
39
-
40
-
41
-
42
-
 43
43 -
 44
44 -
 45
45 -
 46
46 -
 47
47 -
 48
48 -
 49
49 -
 50
50 -
 51
51 -
 52
52 -
 53
53 -
54
-
55
-
56
-
57
-
58
-
59
-
60
-
61
-
62
-
63
-
64
-
65
-
66
-
67
-
68
-
69
-
70
-
71
-
72
-
73
-
74
-
75
-
76
-
77
-
78
-
79
-
80
-
81
-
82
-
83
-
84
-
85
-
86
-
87
-
88
-
89
-
90
-
91
-
92
-
93
-
94
-
95
-
96
-
97
-
98
-
99
-
100
-
101
-
102
-
103
-
104
-
105
-
106
-
107
-
108
-
109
-
110
-
111
-
112
-
113
-
114
-
115
-
116
-
117
-
118
-
119
-
120
-
121
-
122
-
123
-
124
-
125
-
126
-
127
-
128
-
129
-
130
-
131
-
132
-
133
-
134
-
135
-
136
-
137
-
138
-
139
-
140
-
141
-
142
-
143
-
144
-
145
-
146
-
147
-
148
-
149
-
150
-
151
-
152
-
153
-
154
-
155
-
156
-
157
-
158
-
159
-
160
-
161
-
162
-
163
-
164
-
165
-
166
-
167
-
168
-
169
-
170
-
171
-
172
-
173
-
174
-
175
-
176
-
177
-
178
-
179
-
180
-
181
-
182
-
183
-
184
-
185
-
186
-
187
-
188
-
189
-
190
-
191
-
192
-
193
-
194
-
195
-
196
-
197
-
198
-
199
-
200
-
201
-
202
-
203
-
204
-
205
-
206
-
207
-
208
-
209
-
210
-
211
-
212
-
213
-
214
-
215
-
216
-
217
-
218
-
219
-
220
-
221
-
222
-
223
-
224
-
225
-
226
-
227
-
228
-
229
-
230
-
231
-
232
-
233
-
234
-
235
-
236
-
237
-
238
-
239
-
240
-
241
-
242
-
243
-
244
-
245
-
246
-
247
-
248
-
249
-
250
-
251
-
252
-
253
-
254
-
255
-
256
-
257
-
258
-
259
-
260
-
261
-
262
-
263
-
264
-
265
-
266
-
267
-
268
-
269
-
270
-
271
-
272
-
273
-
274
-
275
-
276
 |
 |