HP 11622 HP Rack Options Installation Guide for the 11000 G2 Series Rack and t - Page 12
the template to help align the next rack component.
 |
View all HP 11622 manuals
Add to My Manuals
Save this manual to your list of manuals |
Page 12 highlights
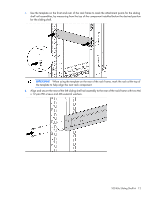
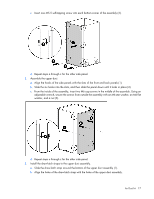
1. Use the template on the front and rear of the rack frame to mark the attachment points for the sliding shelf rail assemblies, by measuring from the top of the component installed below the desired position for the sliding shelf. IMPORTANT: When using the template on the rear of the rack frame, mark the rack at the top of the template to help align the next rack component. 2. Align and secure the rear of the left sliding shelf rail assembly to the rear of the rack frame with two M6 x 12 pan HD screws and M6 external washers. 100 Kilo Sliding Shelf kit 12
-
 1
1 -
2
-
3
-
4
-
5
-
6
-
 7
7 -
 8
8 -
 9
9 -
 10
10 -
 11
11 -
 12
12 -
 13
13 -
 14
14 -
 15
15 -
 16
16 -
 17
17 -
18
-
19
-
20
-
21
-
22
-
23
-
24
-
25
-
26
-
27
-
28
-
29
-
30
-
31
-
32
-
33
-
34
-
35
-
36
-
37
-
38
-
39
-
40
-
41
-
42
-
43
-
44
-
45
-
46
-
47
-
48
-
49
-
50
-
51
-
52
-
53
-
54
-
55
-
56
-
57
-
58
-
59
-
60
-
61
-
62
-
63
-
64
-
65
-
66
-
67
-
68
-
69
-
70
-
71
-
72
-
73
-
74
-
75
-
76
-
77
-
78
-
79
-
80
-
81
-
82
-
83
-
84
-
85
-
86
-
87
-
88
-
89
-
90
-
91
-
92
-
93
-
94
-
95
-
96
-
97
 |
 |

100 Kilo Sliding Shelf kit
12
1.
Use the template on the front and rear of the rack frame to mark the attachment points for the sliding
shelf rail assemblies, by measuring from the top of the component installed below the desired position
for the sliding shelf.
IMPORTANT:
When using the template on the rear of the rack frame, mark the rack at the top of
the template to help align the next rack component.
2.
Align and secure the rear of the left sliding shelf rail assembly to the rear of the rack frame with two M6
x 12 pan HD screws and M6 external washers.