HP 11622 HP Rack Options Installation Guide for the 11000 G2 Series Rack and t - Page 51
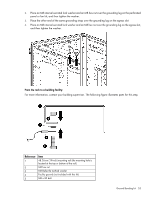
door, and then tighten the washer.
 |
View all HP 11622 manuals
Add to My Manuals
Save this manual to your list of manuals |
Page 51 highlights
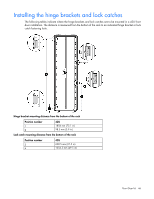
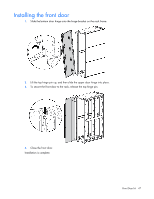
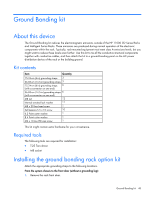
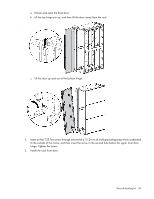
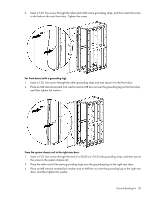
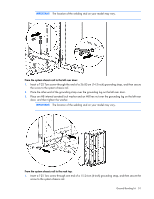
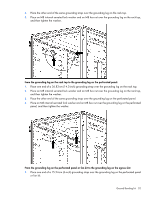
IMPORTANT: The location of the welding stud on your model may vary. From the system chassis rail to the left rear door: 1. Insert a T-25 Torx screw through the end of a 36.83-cm (14.5-inch) grounding strap, and then secure the screw to the system chassis rail. 2. Place the other end of the grounding strap over the grounding lug on the left rear door. 3. Place an M8 internal serrated lock washer and an M8 hex nut over the grounding lug on the left rear door, and then tighten the washer. IMPORTANT: The location of the welding stud on your model may vary. From the system chassis rail to the rack top: 1. Insert a T-25 Torx screw through one end of a 15.24-cm (6-inch) grounding strap, and then secure the screw to the system chassis rail. Ground Bonding kit 51
-
 1
1 -
2
-
3
-
4
-
5
-
6
-
7
-
8
-
9
-
10
-
11
-
12
-
13
-
14
-
15
-
16
-
17
-
18
-
19
-
20
-
21
-
22
-
23
-
24
-
25
-
26
-
27
-
28
-
29
-
30
-
31
-
32
-
33
-
34
-
35
-
36
-
37
-
38
-
39
-
40
-
41
-
42
-
43
-
44
-
45
-
 46
46 -
 47
47 -
 48
48 -
 49
49 -
 50
50 -
 51
51 -
 52
52 -
 53
53 -
 54
54 -
 55
55 -
 56
56 -
57
-
58
-
59
-
60
-
61
-
62
-
63
-
64
-
65
-
66
-
67
-
68
-
69
-
70
-
71
-
72
-
73
-
74
-
75
-
76
-
77
-
78
-
79
-
80
-
81
-
82
-
83
-
84
-
85
-
86
-
87
-
88
-
89
-
90
-
91
-
92
-
93
-
94
-
95
-
96
-
97
 |
 |
