HP 11622 HP Rack Options Installation Guide for the 11000 G2 Series Rack and t - Page 49
Insert an M6 T-25 Torx screw through one end of a 15.24-cm 6-inch grounding strap which is attached
 |
View all HP 11622 manuals
Add to My Manuals
Save this manual to your list of manuals |
Page 49 highlights
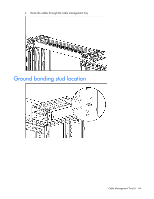
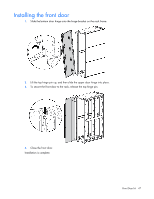
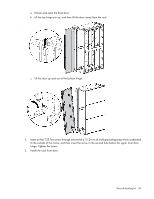
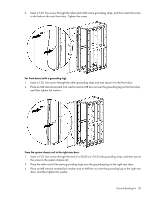
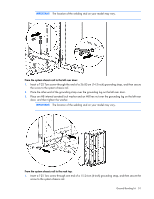
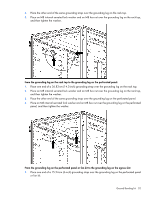
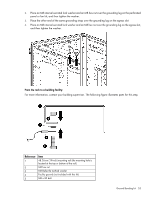
a. Unlock and open the front door. b. Lift the top hinge pin up, and then tilt the door away from the rack. c. Lift the door up and out of the bottom hinge. 2. Insert an M6 T-25 Torx screw through one end of a 15.24-cm (6-inch) grounding strap which is attached to the outside of the frame, and then insert the screw in the second hole below the upper front door hinge. Tighten the screw. 3. Install the rack front door. Ground Bonding kit 49
-
 1
1 -
2
-
3
-
4
-
5
-
6
-
7
-
8
-
9
-
10
-
11
-
12
-
13
-
14
-
15
-
16
-
17
-
18
-
19
-
20
-
21
-
22
-
23
-
24
-
25
-
26
-
27
-
28
-
29
-
30
-
31
-
32
-
33
-
34
-
35
-
36
-
37
-
38
-
39
-
40
-
41
-
42
-
43
-
 44
44 -
 45
45 -
 46
46 -
 47
47 -
 48
48 -
 49
49 -
 50
50 -
 51
51 -
 52
52 -
 53
53 -
 54
54 -
55
-
56
-
57
-
58
-
59
-
60
-
61
-
62
-
63
-
64
-
65
-
66
-
67
-
68
-
69
-
70
-
71
-
72
-
73
-
74
-
75
-
76
-
77
-
78
-
79
-
80
-
81
-
82
-
83
-
84
-
85
-
86
-
87
-
88
-
89
-
90
-
91
-
92
-
93
-
94
-
95
-
96
-
97
 |
 |

Ground Bonding kit 49
a.
Unlock and open the front door.
b.
Lift the top hinge pin up, and then tilt the door away from the rack.
c.
Lift the door up and out of the bottom hinge.
2.
Insert an M6 T-25 Torx screw through one end of a 15.24-cm (6-inch) grounding strap which is attached
to the outside of the frame, and then insert the screw in the second hole below the upper front door
hinge. Tighten the screw.
3.
Install the rack front door.