HP 11622 HP Rack Options Installation Guide for the 11000 G2 Series Rack and t - Page 23
If the rack will be bayed using a 600-mm baying bracket, rotate the foam rail gasket 90 degrees
 |
View all HP 11622 manuals
Add to My Manuals
Save this manual to your list of manuals |
Page 23 highlights
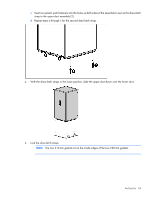
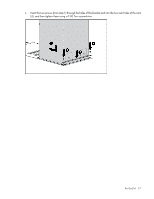
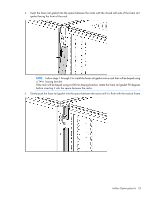
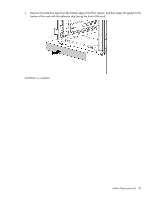
3. Insert the foam rail gasket into the space between the racks with the closed cell side of the foam rail gasket facing the front of the rack. NOTE: Follow steps 1 through 3 to install the foam rail gasket into a rack that will be bayed using a 24-in. baying bracket. If the rack will be bayed using a 600-mm baying bracket, rotate the foam rail gasket 90 degrees before inserting it into the space between the racks. 4. Gently push the foam rail gasket into the space between the racks until it is flush with the vertical frame. Airflow Optimization kit 23
-
 1
1 -
2
-
3
-
4
-
5
-
6
-
7
-
8
-
9
-
10
-
11
-
12
-
13
-
14
-
15
-
16
-
17
-
 18
18 -
 19
19 -
 20
20 -
 21
21 -
 22
22 -
 23
23 -
 24
24 -
 25
25 -
 26
26 -
 27
27 -
 28
28 -
29
-
30
-
31
-
32
-
33
-
34
-
35
-
36
-
37
-
38
-
39
-
40
-
41
-
42
-
43
-
44
-
45
-
46
-
47
-
48
-
49
-
50
-
51
-
52
-
53
-
54
-
55
-
56
-
57
-
58
-
59
-
60
-
61
-
62
-
63
-
64
-
65
-
66
-
67
-
68
-
69
-
70
-
71
-
72
-
73
-
74
-
75
-
76
-
77
-
78
-
79
-
80
-
81
-
82
-
83
-
84
-
85
-
86
-
87
-
88
-
89
-
90
-
91
-
92
-
93
-
94
-
95
-
96
-
97
 |
 |

Airflow Optimization kit 23
3.
Insert the foam rail gasket into the space between the racks with the closed cell side of the foam rail
gasket facing the front of the rack.
NOTE:
Follow steps 1 through 3 to install the foam rail gasket into a rack that will be bayed using
a 24-in. baying bracket.
If the rack will be bayed using a 600-mm baying bracket, rotate the foam rail gasket 90 degrees
before inserting it into the space between the racks.
4.
Gently push the foam rail gasket into the space between the racks until it is flush with the vertical frame.