HP 11622 HP Rack Options Installation Guide for the 11000 G2 Series Rack and t - Page 90
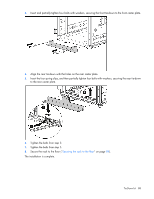
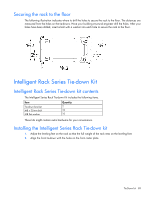
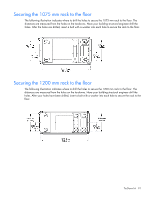
Secure the rack to the floor, The installation is complete.
 |
View all HP 11622 manuals
Add to My Manuals
Save this manual to your list of manuals |
Page 90 highlights
3. Insert and partially tighten four bolts with washers, securing the front tie-down to the front caster plate. 4. Align the rear tie-down with the holes on the rear caster plate. 5. Insert the four spring clips, and then partially tighten four bolts with washers, securing the rear tie-down to the rear caster plate. 6. Tighten the bolts from step 3. 7. Tighten the bolts from step 5. 8. Secure the rack to the floor ("Securing the rack to the floor" on page 89). The installation is complete. Tie-Down kit 90
-
 1
1 -
2
-
3
-
4
-
5
-
6
-
7
-
8
-
9
-
10
-
11
-
12
-
13
-
14
-
15
-
16
-
17
-
18
-
19
-
20
-
21
-
22
-
23
-
24
-
25
-
26
-
27
-
28
-
29
-
30
-
31
-
32
-
33
-
34
-
35
-
36
-
37
-
38
-
39
-
40
-
41
-
42
-
43
-
44
-
45
-
46
-
47
-
48
-
49
-
50
-
51
-
52
-
53
-
54
-
55
-
56
-
57
-
58
-
59
-
60
-
61
-
62
-
63
-
64
-
65
-
66
-
67
-
68
-
69
-
70
-
71
-
72
-
73
-
74
-
75
-
76
-
77
-
78
-
79
-
80
-
81
-
82
-
83
-
84
-
 85
85 -
 86
86 -
 87
87 -
 88
88 -
 89
89 -
 90
90 -
 91
91 -
 92
92 -
 93
93 -
 94
94 -
 95
95 -
96
-
97
 |
 |

Tie-Down kit 90
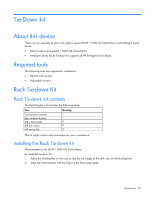
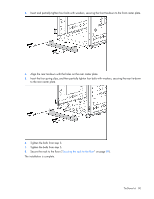
3.
Insert and partially tighten four bolts with washers, securing the front tie-down to the front caster plate.
4.
Align the rear tie-down with the holes on the rear caster plate.
5.
Insert the four spring clips, and then partially tighten four bolts with washers, securing the rear tie-down
to the rear caster plate.
6.
Tighten the bolts from step 3.
7.
Tighten the bolts from step 5.
8.
Secure the rack to the floor ("
Securing the rack to the floor
" on page
89
).
The installation is complete.