HP 11622 HP Rack Options Installation Guide for the 11000 G2 Series Rack and t - Page 33
Installing the 2U cable management bracket, Installing the cable management D-ring bracket
 |
View all HP 11622 manuals
Add to My Manuals
Save this manual to your list of manuals |
Page 33 highlights
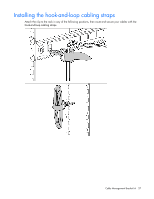
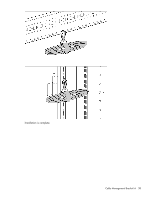
Installing the 2U cable management bracket 1. Insert two 1/4 turn plastic latches on either side of the 2U cable management bracket. 2. Align the 2U cable management bracket to the screw holes in the desired location of the rack (1). 3. Turn the two 1/4 turn plastic latches on either side of the 2U cable management bracket clockwise until they lock in place (2). Installing the cable management D-ring bracket The cable management D-ring bracket can be installed in either a front mount or a side mount, depending on your rack configuration. Cable Management Bracket kit 33
-
 1
1 -
2
-
3
-
4
-
5
-
6
-
7
-
8
-
9
-
10
-
11
-
12
-
13
-
14
-
15
-
16
-
17
-
18
-
19
-
20
-
21
-
22
-
23
-
24
-
25
-
26
-
27
-
 28
28 -
 29
29 -
 30
30 -
 31
31 -
 32
32 -
 33
33 -
 34
34 -
 35
35 -
 36
36 -
 37
37 -
 38
38 -
39
-
40
-
41
-
42
-
43
-
44
-
45
-
46
-
47
-
48
-
49
-
50
-
51
-
52
-
53
-
54
-
55
-
56
-
57
-
58
-
59
-
60
-
61
-
62
-
63
-
64
-
65
-
66
-
67
-
68
-
69
-
70
-
71
-
72
-
73
-
74
-
75
-
76
-
77
-
78
-
79
-
80
-
81
-
82
-
83
-
84
-
85
-
86
-
87
-
88
-
89
-
90
-
91
-
92
-
93
-
94
-
95
-
96
-
97
 |
 |

Cable Management Bracket kit
33
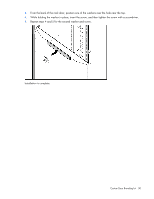
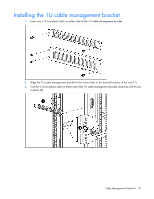
Installing the 2U cable management bracket
1.
Insert two 1/4 turn plastic latches on either side of the 2U cable management bracket.
2.
Align the 2U cable management bracket to the screw holes in the desired location of the rack (1).
3.
Turn the two 1/4 turn plastic latches on either side of the 2U cable management bracket clockwise until
they lock in place (2).
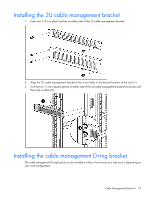
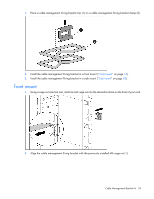
Installing the cable management D-ring bracket
The cable management D-ring bracket can be installed in either a front mount or a side mount, depending on
your rack configuration.