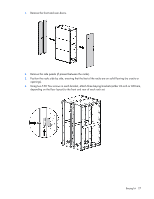
HP 11622 HP Rack Options Installation Guide for the 11000 G2 Series Rack and t - Page 29
Custom Door Branding kit, About this device, Kit contents, Required tools
 |
View all HP 11622 manuals
Add to My Manuals
Save this manual to your list of manuals |
Page 29 highlights
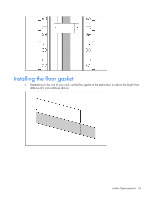
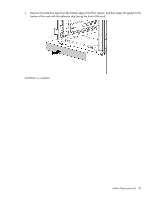
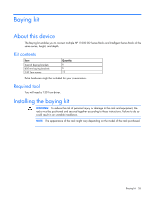
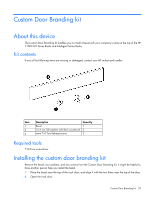
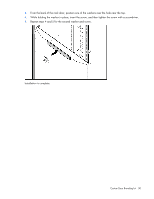
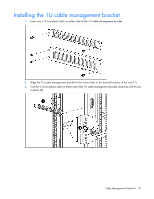
Custom Door Branding kit About this device The Custom Door Branding kit enables you to install a bezel with your company's name at the top of the HP 11000 G2 Series Racks and Intelligent Series Racks. Kit contents If any of the following items are missing or damaged, contact your HP authorized reseller. Item 1 2 3 Description Bezel 10.5 mm OD washers with 8mm countersink 6mm T-10 Torx flathead screws Quantity 1 2 2 Required tools T-10 Torx screwdriver Installing the custom door branding kit Remove the bezel, two washers, and two screws from the Custom Door Branding kit. It might be helpful to have another person help you install the bezel. 1. Place the bezel near the top of the rack door, and align it with the two holes near the top of the door. 2. Open the rack door. Custom Door Branding kit 29
-
 1
1 -
2
-
3
-
4
-
5
-
6
-
7
-
8
-
9
-
10
-
11
-
12
-
13
-
14
-
15
-
16
-
17
-
18
-
19
-
20
-
21
-
22
-
23
-
 24
24 -
 25
25 -
 26
26 -
 27
27 -
 28
28 -
 29
29 -
 30
30 -
 31
31 -
 32
32 -
 33
33 -
 34
34 -
35
-
36
-
37
-
38
-
39
-
40
-
41
-
42
-
43
-
44
-
45
-
46
-
47
-
48
-
49
-
50
-
51
-
52
-
53
-
54
-
55
-
56
-
57
-
58
-
59
-
60
-
61
-
62
-
63
-
64
-
65
-
66
-
67
-
68
-
69
-
70
-
71
-
72
-
73
-
74
-
75
-
76
-
77
-
78
-
79
-
80
-
81
-
82
-
83
-
84
-
85
-
86
-
87
-
88
-
89
-
90
-
91
-
92
-
93
-
94
-
95
-
96
-
97
 |
 |
