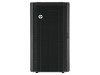
HP 11622 HP Rack Options Installation Guide for the 11000 G2 Series Rack and t - Page 78
Pull the cage nut through the square-rail perforation until the top lip snaps into position.
 |
View all HP 11622 manuals
Add to My Manuals
Save this manual to your list of manuals |
Page 78 highlights
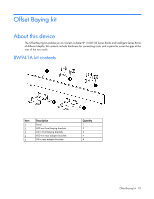
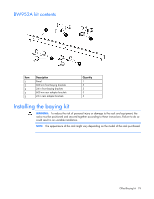
1. Align the cage nuts with the square-rail perforations on the front of the shelf. 2. Use the cage nut insertion tool (not included) to secure each cage nut to the shelf. a. Hook the bottom lip of the cage nut in the square-rail perforation. b. Insert the tip of the insertion tool through the perforation, and then hook the top lip of the cage nut. c. Pull the cage nut through the square-rail perforation until the top lip snaps into position. 3. Firmly hold the shelf, and then insert the shelf into the rack, tilting the shelf slightly so that the rear teeth on the shelf clear the rear of the rack. 4. Straighten the shelf, and then insert the rear teeth into the mounting holes on the rear of the rack. Server/Utility Shelf kit 78
-
 1
1 -
2
-
3
-
4
-
5
-
6
-
7
-
8
-
9
-
10
-
11
-
12
-
13
-
14
-
15
-
16
-
17
-
18
-
19
-
20
-
21
-
22
-
23
-
24
-
25
-
26
-
27
-
28
-
29
-
30
-
31
-
32
-
33
-
34
-
35
-
36
-
37
-
38
-
39
-
40
-
41
-
42
-
43
-
44
-
45
-
46
-
47
-
48
-
49
-
50
-
51
-
52
-
53
-
54
-
55
-
56
-
57
-
58
-
59
-
60
-
61
-
62
-
63
-
64
-
65
-
66
-
67
-
68
-
69
-
70
-
71
-
72
-
 73
73 -
 74
74 -
 75
75 -
 76
76 -
 77
77 -
 78
78 -
 79
79 -
 80
80 -
 81
81 -
 82
82 -
 83
83 -
84
-
85
-
86
-
87
-
88
-
89
-
90
-
91
-
92
-
93
-
94
-
95
-
96
-
97
 |
 |

Server/Utility Shelf kit 78
1.
Align the cage nuts with the square-rail perforations on the front of the shelf.
2.
Use the cage nut insertion tool (not included) to secure each cage nut to the shelf.
a.
Hook the bottom lip of the cage nut in the square-rail perforation.
b.
Insert the tip of the insertion tool through the perforation, and then hook the top lip of the cage nut.
c.
Pull the cage nut through the square-rail perforation until the top lip snaps into position.
3.
Firmly hold the shelf, and then insert the shelf into the rack, tilting the shelf slightly so that the rear teeth
on the shelf clear the rear of the rack.
4.
Straighten the shelf, and then insert the rear teeth into the mounting holes on the rear of the rack.