HP 11622 HP Rack Options Installation Guide for the 11000 G2 Series Rack and t - Page 30
Repeat steps 4 and 5 for the second washer and screw., While holding the washer in place
 |
View all HP 11622 manuals
Add to My Manuals
Save this manual to your list of manuals |
Page 30 highlights
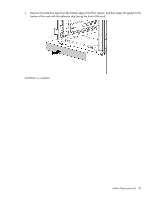
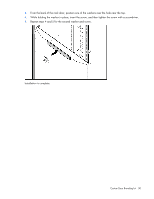
3. From the back of the rack door, position one of the washers over the hole near the top. 4. While holding the washer in place, insert the screw, and then tighten the screw with a screwdriver. 5. Repeat steps 4 and 5 for the second washer and screw. Installation is complete. Custom Door Branding kit 30
-
 1
1 -
2
-
3
-
4
-
5
-
6
-
7
-
8
-
9
-
10
-
11
-
12
-
13
-
14
-
15
-
16
-
17
-
18
-
19
-
20
-
21
-
22
-
23
-
24
-
 25
25 -
 26
26 -
 27
27 -
 28
28 -
 29
29 -
 30
30 -
 31
31 -
 32
32 -
 33
33 -
 34
34 -
 35
35 -
36
-
37
-
38
-
39
-
40
-
41
-
42
-
43
-
44
-
45
-
46
-
47
-
48
-
49
-
50
-
51
-
52
-
53
-
54
-
55
-
56
-
57
-
58
-
59
-
60
-
61
-
62
-
63
-
64
-
65
-
66
-
67
-
68
-
69
-
70
-
71
-
72
-
73
-
74
-
75
-
76
-
77
-
78
-
79
-
80
-
81
-
82
-
83
-
84
-
85
-
86
-
87
-
88
-
89
-
90
-
91
-
92
-
93
-
94
-
95
-
96
-
97
 |
 |

Custom Door Branding kit
30
3.
From the back of the rack door, position one of the washers over the hole near the top.
4.
While holding the washer in place, insert the screw, and then tighten the screw with a screwdriver.
5.
Repeat steps 4 and 5 for the second washer and screw.
Installation is complete.