HP 1510 User Guide - Page 47
Replace the print cartridges, HP Image Zone, HP Director, HP Solution Center - psc ink cartridge
 |
UPC - 829160813608
View all HP 1510 manuals
Add to My Manuals
Save this manual to your list of manuals |
Page 47 highlights
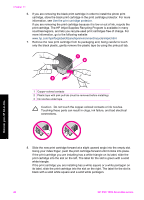
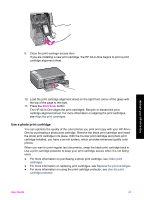
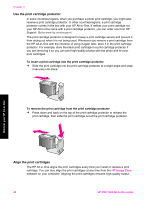
Chapter 11 Maintain your HP All-in-One 1 Copper-colored contacts 2 Plastic tape with pink pull tab (must be removed before installing) 3 Ink nozzles under tape Hold the print cartridges by their black plastic sides, with the label on top. Do not touch the copper-colored contacts or the ink nozzles. Warning Be careful not to drop the print cartridges. This can damage them, making them unusable. Replace the print cartridges When the ink level for the print cartridge is low, replace the print cartridge. Make sure you have a replacement print cartridge available before removing the empty print cartridge. You should also replace the print cartridges when you see faded text or if you experience print quality issues related to the print cartridges. You can check the estimated amount of ink remaining in your cartridges by using the HP Image Zone software that came with your HP All-in-One. For information on checking the ink levels from the HP Director (or HP Solution Center), see Check the estimated ink levels. Tip You can also use these instructions to replace the black print cartridge with a photo print cartridge for printing high-quality color photos. To find out the reorder number for all the print cartridges that your HP All-in-One supports, see Order print cartridges. To order print cartridges for your HP All-in-One, go to www.hp.com. If prompted, choose your country/region, follow the prompts to select your product, and then click one of the shopping links on the page. 44 HP PSC 1500 All-in-One series
-
 1
1 -
2
-
3
-
4
-
5
-
6
-
7
-
8
-
9
-
10
-
11
-
12
-
13
-
14
-
15
-
16
-
17
-
18
-
19
-
20
-
21
-
22
-
23
-
24
-
25
-
26
-
27
-
28
-
29
-
30
-
31
-
32
-
33
-
34
-
35
-
36
-
37
-
38
-
39
-
40
-
41
-
 42
42 -
 43
43 -
 44
44 -
 45
45 -
 46
46 -
 47
47 -
 48
48 -
 49
49 -
 50
50 -
 51
51 -
 52
52 -
53
-
54
-
55
-
56
-
57
-
58
-
59
-
60
-
61
-
62
-
63
-
64
-
65
-
66
-
67
-
68
-
69
-
70
-
71
-
72
-
73
-
74
-
75
-
76
-
77
-
78
-
79
-
80
-
81
-
82
-
83
-
84
-
85
-
86
-
87
-
88
-
89
-
90
-
91
-
92
-
93
-
94
-
95
-
96
 |
 |
