HP 8100C HP Digital Sender 8100C - (English) Administrator Guide, C7707-90006 - Page 21
General, Network, E-Mail, I-Fax, Advanced
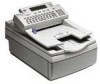 |
View all HP 8100C manuals
Add to My Manuals
Save this manual to your list of manuals |
Page 21 highlights
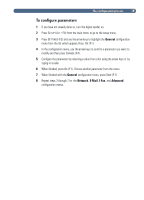
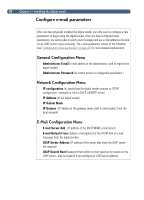
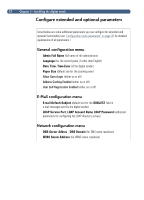
19 1 If you have not already done so, turn the digital sender on. 2 Press SETUP (ALT+F4) from the main menu to go to the setup menu. 3 Press SETTINGS (F2) and use the arrow keys to highlight the General configuration menu from the list which appears. Press OK (F1). 4 In the configuration menu, use the arrow keys to scroll to a parameter you want to modify and then press CHANGE (F3). 5 Configure the parameters by selecting a value from a list using the arrow keys or by typing in a value. 6 When finished, press OK (F1). Choose another parameter from the menu. 7 When finished with the General configuration menu, press SAVE (F1). 8 Repeat steps 3 through 7 for the Network, E-Mail, I-Fax, and Advanced configuration menus.
-
 1
1 -
2
-
3
-
4
-
5
-
6
-
7
-
8
-
9
-
10
-
11
-
12
-
13
-
14
-
15
-
 16
16 -
 17
17 -
 18
18 -
 19
19 -
 20
20 -
 21
21 -
 22
22 -
 23
23 -
 24
24 -
 25
25 -
 26
26 -
27
-
28
-
29
-
30
-
31
-
32
-
33
-
34
-
35
-
36
-
37
-
38
-
39
-
40
-
41
-
42
-
43
-
44
-
45
-
46
-
47
-
48
-
49
-
50
-
51
-
52
-
53
-
54
-
55
-
56
-
57
-
58
-
59
-
60
-
61
-
62
-
63
-
64
-
65
-
66
-
67
-
68
-
69
-
70
-
71
-
72
-
73
-
74
-
75
-
76
-
77
-
78
-
79
-
80
-
81
-
82
-
83
-
84
-
85
-
86
-
87
-
88
-
89
-
90
 |
 |

+!À±¹¶³°ºÉ¸µÂ´º¶³±Ãµ¶¹ÀÁÁ
±
19
Ƚ·É½¼ÀµÊË¿¹·Ç´¿´³¹»¹¿º
1
If you have not already done so, turn the digital sender on.
2
Press
S
ETUP
(
A
LT
+
F4
)
from the main menu to go to the setup menu.
3
Press
S
ETTINGS
(
F2
) and use the arrow keys to highlight the
General
configuration
menu from the list which appears. Press
O
K
(
F1
).
4
In the configuration menu, use the arrow keys to scroll to a parameter you want to
modify and then press
C
HANGE
(
F3
).
5
Configure the parameters by selecting a value from a list using the arrow keys or by
typing in a value.
6
When finished, press
O
K
(
F1
). Choose another parameter from the menu.
7
When finished with the
General
configuration menu, press
S
AVE
(
F1
).
8
Repeat steps 3 through 7 for the
Network
,
E-Mail
,
I-Fax
, and
Advanced
configuration menus.