HP 910 User Guide - Page 28
Exif Print, Store and handle photo paper, To print Exif Print-enhanced photos - printer specification
 |
View all HP 910 manuals
Add to My Manuals
Save this manual to your list of manuals |
Page 28 highlights
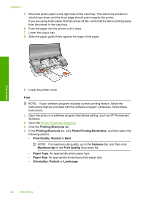
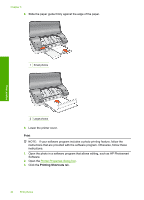
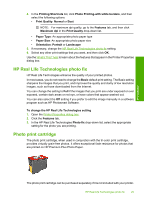
Chapter 5 To install the photo print cartridge ▲ To install the photo print cartridge, remove the black print cartridge from the printer, and then install the photo print cartridge in the right side of the print cartridge cradle. NOTE: To learn how to install a print cartridge, see Installation instructions. To protect a print cartridge when it is not in the printer, follow the Maintain print cartridges guidelines. Print photos To use the photo print cartridge 1. Open the Printer Properties dialog box. 2. Click the Printing Shortcuts tab. 3. In the Printing Shortcuts list, click either Photo Printing-Borderless or Photo Printing-with white borders. 4. In the Print Quality drop-down list, click Normal or Best. NOTE: For maximum dpi quality, go to the Features tab, and then click Maximum dpi in the Print Quality drop-down list. 5. In the Paper Type drop-down list, select the appropriate photo paper type. 6. Select any other print settings that you want, and then click OK. Exif Print Exif Print (Exchangeable Image File Format 2.2) is an international digital imaging standard that simplifies digital photography and enhances printed photos. When a photo is taken with an Exif Print-enabled digital camera, Exif Print captures information such as exposure time, type of flash, and color saturation, and stores it in the image file. The printer software then uses this information to automatically perform image-specific enhancements to create outstanding photos. To print Exif Print-enhanced photos, you must have the following items: • A digital camera that supports Exif Print • Exif Print-enabled photo software, such as HP Photosmart Software To print Exif Print-enhanced photos 1. Open the photo in an Exif Print-enabled software program that allows editing, such as HP Photosmart Software. 2. Open the Printer Properties dialog box. 3. Click the Features tab. 4. In the Paper Type drop-down list, click More, and then select the appropriate photo paper type. 5. In the Print Quality drop-down list, click Normal, Best, or Maximum dpi. 6. Select any other print settings that you want, and then click OK. The printer software automatically optimizes the printed image. Store and handle photo paper Follow these instructions to maintain the quality of HP brand photo paper. 26 Print photos
-
 1
1 -
2
-
3
-
4
-
5
-
6
-
7
-
8
-
9
-
10
-
11
-
12
-
13
-
14
-
15
-
16
-
17
-
18
-
19
-
20
-
21
-
22
-
 23
23 -
 24
24 -
 25
25 -
 26
26 -
 27
27 -
 28
28 -
 29
29 -
 30
30 -
 31
31 -
 32
32 -
 33
33 -
34
-
35
-
36
-
37
-
38
-
39
-
40
-
41
-
42
-
43
-
44
-
45
-
46
-
47
-
48
-
49
-
50
-
51
-
52
-
53
-
54
-
55
-
56
-
57
-
58
-
59
-
60
-
61
-
62
-
63
-
64
-
65
-
66
-
67
-
68
-
69
-
70
-
71
-
72
-
73
-
74
-
75
-
76
-
77
-
78
-
79
-
80
-
81
-
82
-
83
-
84
-
85
-
86
-
87
-
88
-
89
-
90
-
91
-
92
-
93
-
94
-
95
-
96
-
97
-
98
 |
 |
