HP 910 User Guide - Page 39
Print transparencies, For great results, use HP Premium Inkjet Transparency Film.
 |
View all HP 910 manuals
Add to My Manuals
Save this manual to your list of manuals |
Page 39 highlights
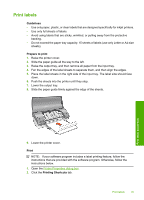
8. Lower the printer cover. Print 1. Open the Printer Properties dialog box. 2. Click the Features tab, and then specify the print settings in the order shown below: • Size: 5x7in. • Paper Type: Click More, click Specialty Papers, and then click HP CD/DVD Tattoo. • Print Quality: Best NOTE: If you are using the HP Photosmart Essential Software, click the Advanced tab. Then expand Printer Features, and set Mirror Image to On. 3. Select any other print settings that you want, and then click OK. Use the What's This? help to learn about the features that appear in the Printer Properties dialog box. Print transparencies Guidelines • For great results, use HP Premium Inkjet Transparency Film. • Do not exceed the paper tray capacity: 20 transparencies. Prepare to print 1. Raise the printer cover. 2. Slide the paper guide all the way to the left. 3. Raise the output tray, and then remove all paper from the input tray. 4. Place the transparencies in the right side of the tray. The side to be printed should face down and the adhesive strip should face up and toward the printer. 5. Carefully push the transparencies into the printer until they stop, so that the adhesive strips do not catch on one another. 6. Lower the output tray. 7. Slide the paper guide firmly against the edge of the transparencies. Print other documents Print transparencies 37
-
 1
1 -
2
-
3
-
4
-
5
-
6
-
7
-
8
-
9
-
10
-
11
-
12
-
13
-
14
-
15
-
16
-
17
-
18
-
19
-
20
-
21
-
22
-
23
-
24
-
25
-
26
-
27
-
28
-
29
-
30
-
31
-
32
-
33
-
 34
34 -
 35
35 -
 36
36 -
 37
37 -
 38
38 -
 39
39 -
 40
40 -
 41
41 -
 42
42 -
 43
43 -
 44
44 -
45
-
46
-
47
-
48
-
49
-
50
-
51
-
52
-
53
-
54
-
55
-
56
-
57
-
58
-
59
-
60
-
61
-
62
-
63
-
64
-
65
-
66
-
67
-
68
-
69
-
70
-
71
-
72
-
73
-
74
-
75
-
76
-
77
-
78
-
79
-
80
-
81
-
82
-
83
-
84
-
85
-
86
-
87
-
88
-
89
-
90
-
91
-
92
-
93
-
94
-
95
-
96
-
97
-
98
 |
 |
