HP 910 User Guide - Page 65
Manually clean print cartridges, Open the HP Printer cover.
 |
View all HP 910 manuals
Add to My Manuals
Save this manual to your list of manuals |
Page 65 highlights
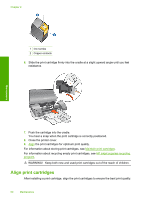
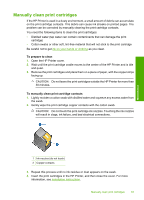
Manually clean print cartridges If the HP Printer is used in a dusty environment, a small amount of debris can accumulate on the print cartridge contacts. This debris can cause ink streaks on printed pages. The problem can be corrected by manually cleaning the print cartridge contacts. You need the following items to clean the print cartridges: • Distilled water (tap water can contain contaminants that can damage the print cartridge) • Cotton swabs or other soft, lint-free material that will not stick to the print cartridge Be careful not to get ink on your hands or clothing as you clean. To prepare to clean 1. Open the HP Printer cover. 2. Wait until the print cartridge cradle moves to the center of the HP Printer and is idle and quiet. 3. Remove the print cartridges and place them on a piece of paper, with the copper strips facing up. CAUTION: Do not leave the print cartridges outside the HP Printer for more than 30 minutes. To manually clean print cartridge contacts 1. Lightly moisten a cotton swab with distilled water and squeeze any excess water from the swab. 2. Gently wipe the print cartridge copper contacts with the cotton swab. CAUTION: Do not touch the print cartridge ink nozzles. Touching the ink nozzles will result in clogs, ink failure, and bad electrical connections. Maintenance 1 Ink nozzles (do not touch) 2 Copper contacts 3. Repeat this process until no ink residue or dust appears on the swab. 4. Insert the print cartridges in the HP Printer, and then close the cover. For more information, see Installation instructions. Manually clean print cartridges 63
-
 1
1 -
2
-
3
-
4
-
5
-
6
-
7
-
8
-
9
-
10
-
11
-
12
-
13
-
14
-
15
-
16
-
17
-
18
-
19
-
20
-
21
-
22
-
23
-
24
-
25
-
26
-
27
-
28
-
29
-
30
-
31
-
32
-
33
-
34
-
35
-
36
-
37
-
38
-
39
-
40
-
41
-
42
-
43
-
44
-
45
-
46
-
47
-
48
-
49
-
50
-
51
-
52
-
53
-
54
-
55
-
56
-
57
-
58
-
59
-
 60
60 -
 61
61 -
 62
62 -
 63
63 -
 64
64 -
 65
65 -
 66
66 -
 67
67 -
 68
68 -
 69
69 -
 70
70 -
71
-
72
-
73
-
74
-
75
-
76
-
77
-
78
-
79
-
80
-
81
-
82
-
83
-
84
-
85
-
86
-
87
-
88
-
89
-
90
-
91
-
92
-
93
-
94
-
95
-
96
-
97
-
98
 |
 |
