HP DesignJet T2600 User Guide - Page 137
Visual check for errors while printing the diagnostic sheet, Scan or copy the diagnostic plot
 |
View all HP DesignJet T2600 manuals
Add to My Manuals
Save this manual to your list of manuals |
Page 137 highlights
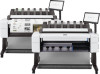
Prepare the printer and the paper to print the diagnostic sheet Turn on your printer and wait until it is functioning. Then select the paper on which the diagnostic plot is going to be printed (you can reuse the diagnostic plot any time in the future, if it is saved carefully). Ideally, the diagnostic plot should be printed on glossy paper, and you are highly recommended to do that if you use your printer mostly for scanning or copying photo originals (posters, pictures printed on glossy paper, etc). If you use your printer mostly to scan or copy matte originals, then you can use any matte white paper to print the diagnostic plot. Do not use recycled or tracing paper to print this plot. The size of the diagnostic plot is 610 × 914 mm (24 × 36 in). It can be printed on any 914 mm (36 in) landscape or 610 mm (24 in) portrait paper roll. You can also use a single sheet that is at least 610 × 914 mm (24 × 36 in). Once the correct paper is loaded, if this paper permits color calibration then we recommend color-calibrating the printer. You can print the diagnostic plot from the front panel: tap , then Scanner Preferences > Scanner IQ plot. Visual check for errors while printing the diagnostic sheet Once the diagnostic plot is printed, the first step is to check that all the patterns included in it are correctly printed. The diagnostic plot, if printed correctly, should look like this: If you see any problems, you should follow the recommended recovery procedure, all of which are available by tapping , then Scanner Preferences > Print Scanner IQ Plot at the front panel. Once the printer has been diagnosed and it is working correctly, you can reprint the diagnostic plot as described in Scanner diagnostic plot on page 128. Scan or copy the diagnostic plot There are two options for evaluating the diagnostic plot: scanning into a JPEG file, or copying onto paper. We recommend using the scan option, so that the generated file can be analyzed more easily by a remote support engineer if necessary. If you decide to scan the plot, first adjust your computer's monitor. Once you have scanned the diagnostic plot, remember to open the scanned file in any image viewer software and select a zoom of 100% for correct visual evaluation of patterns. If you decide to copy, make sure that a paper roll at least 36 in (914 mm) wide is loaded in the printer. Ideally, the same type of paper used to print the diagnostic plot should be used for copying it. These are the settings that you should select: ENWW Scanner diagnostic plot 129
-
 1
1 -
2
-
3
-
4
-
5
-
6
-
7
-
8
-
9
-
10
-
11
-
12
-
13
-
14
-
15
-
16
-
17
-
18
-
19
-
20
-
21
-
22
-
23
-
24
-
25
-
26
-
27
-
28
-
29
-
30
-
31
-
32
-
33
-
34
-
35
-
36
-
37
-
38
-
39
-
40
-
41
-
42
-
43
-
44
-
45
-
46
-
47
-
48
-
49
-
50
-
51
-
52
-
53
-
54
-
55
-
56
-
57
-
58
-
59
-
60
-
61
-
62
-
63
-
64
-
65
-
66
-
67
-
68
-
69
-
70
-
71
-
72
-
73
-
74
-
75
-
76
-
77
-
78
-
79
-
80
-
81
-
82
-
83
-
84
-
85
-
86
-
87
-
88
-
89
-
90
-
91
-
92
-
93
-
94
-
95
-
96
-
97
-
98
-
99
-
100
-
101
-
102
-
103
-
104
-
105
-
106
-
107
-
108
-
109
-
110
-
111
-
112
-
113
-
114
-
115
-
116
-
117
-
118
-
119
-
120
-
121
-
122
-
123
-
124
-
125
-
126
-
127
-
128
-
129
-
130
-
131
-
 132
132 -
 133
133 -
 134
134 -
 135
135 -
 136
136 -
 137
137 -
 138
138 -
 139
139 -
 140
140 -
 141
141 -
 142
142 -
143
-
144
-
145
-
146
-
147
-
148
-
149
-
150
-
151
-
152
-
153
-
154
-
155
-
156
-
157
-
158
-
159
-
160
-
161
-
162
-
163
-
164
-
165
-
166
-
167
-
168
-
169
-
170
-
171
-
172
-
173
-
174
-
175
-
176
-
177
-
178
-
179
-
180
-
181
-
182
-
183
-
184
-
185
-
186
-
187
-
188
-
189
-
190
-
191
-
192
-
193
-
194
-
195
-
196
-
197
-
198
-
199
-
200
-
201
-
202
-
203
-
204
-
205
-
206
-
207
-
208
-
209
-
210
-
211
-
212
-
213
-
214
-
215
-
216
-
217
-
218
-
219
-
220
-
221
-
222
-
223
-
224
-
225
-
226
-
227
-
228
-
229
-
230
-
231
-
232
-
233
-
234
-
235
-
236
-
237
-
238
-
239
-
240
-
241
-
242
-
243
-
244
-
245
-
246
-
247
-
248
-
249
-
250
-
251
-
252
-
253
-
254
-
255
-
256
 |
 |
