HP Designjet 4200 HP Designjet cc800ps, 815mfp, 5500mfp, and 4200 scanner - Co - Page 53
result, may be used to further enhance the image. Observe below the same example
 |
View all HP Designjet 4200 manuals
Add to My Manuals
Save this manual to your list of manuals |
Page 53 highlights
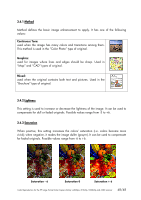
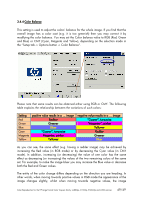
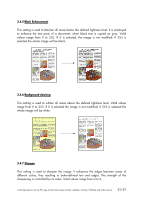
3.4.8 Blur This setting is used to smooth the image. It is useful when the scanned original is "noisy" (i.e. color disturbance, graininess and non-area uniformity). Valid values range from 0 to 12. Blurring is not the opposite of sharpening: sharpening works on the image's edges only, whilst blurring smoothes out the whole color or gray tone areas. In fact, these two settings combined, by blurring away noise in the image first and then sharpening the result, may be used to further enhance the image. Observe below the same example as before, with blur and sharpening applied. Note that now there is no "augmented noise" in the text area, with respect to when only sharpening was applied. Color Reproduction for the HP Large Format Color Copiers family: cc800ps, 815mfp, 5500mfp and 4200 scanner 53/53
-
 1
1 -
2
-
3
-
4
-
5
-
6
-
7
-
8
-
9
-
10
-
11
-
12
-
13
-
14
-
15
-
16
-
17
-
18
-
19
-
20
-
21
-
22
-
23
-
24
-
25
-
26
-
27
-
28
-
29
-
30
-
31
-
32
-
33
-
34
-
35
-
36
-
37
-
38
-
39
-
40
-
41
-
42
-
43
-
44
-
45
-
46
-
47
-
 48
48 -
 49
49 -
 50
50 -
 51
51 -
 52
52 -
 53
53 -
 54
54 -
 55
55 -
 56
56 -
 57
57 -
 58
58 -
59
-
60
-
61
 |
 |
