HP Designjet 4200 HP Designjet cc800ps, 815mfp, 5500mfp, and 4200 scanner - Co - Page 57
Setup, Extended Thickness, Camera A-B, Use extended thickness paper handling
 |
View all HP Designjet 4200 manuals
Add to My Manuals
Save this manual to your list of manuals |
Page 57 highlights
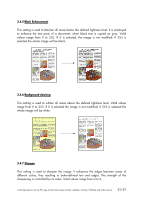
3. Press the Setup button. 4. Select the Extended Thickness tab. 5. Change the value of the Camera A-B field. Normally, only positive values should be used. 6. Run test scans and readjust the values until you are satisfied that the lines are stitched correctly. 7. Scanning thick originals can give distorted results at the top and bottom edges of the image, where the edge meets the scanner's rollers. You can omit edge distortion by letting the scanner skip the leading and trailing edges. Check the box Use extended thickness paper handling to enable skipping of the image edges. 8. Click OK to accept your settings. 9. Repeat the above steps until you are satisfied with the results. Note: ¾ Auto-adjustment of the scanner's light profile, stitching and other functions only take place with the insertion slot in the Normal position. When in extended media thickness position, the last auto-adjustment is stored and utilized. This means that you should from time to time, and especially when powering on the scanner, return to the Normal position to allow it to auto-adjust. Color Reproduction for the HP Large Format Color Copiers family: cc800ps, 815mfp, 5500mfp and 4200 scanner 57/57
-
 1
1 -
2
-
3
-
4
-
5
-
6
-
7
-
8
-
9
-
10
-
11
-
12
-
13
-
14
-
15
-
16
-
17
-
18
-
19
-
20
-
21
-
22
-
23
-
24
-
25
-
26
-
27
-
28
-
29
-
30
-
31
-
32
-
33
-
34
-
35
-
36
-
37
-
38
-
39
-
40
-
41
-
42
-
43
-
44
-
45
-
46
-
47
-
48
-
49
-
50
-
51
-
 52
52 -
 53
53 -
 54
54 -
 55
55 -
 56
56 -
 57
57 -
 58
58 -
 59
59 -
 60
60 -
 61
61
 |
 |
