HP Deskjet 6980 User Guide - Pre-Windows 2000 - Page 99
Print task quick sets
 |
UPC - 882780129580
View all HP Deskjet 6980 manuals
Add to My Manuals
Save this manual to your list of manuals |
Page 99 highlights
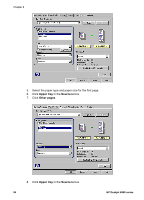
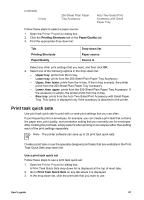
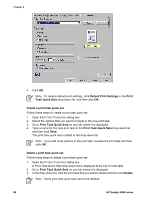
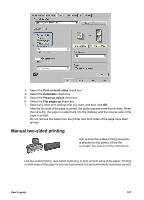
(continued) In tray 250-Sheet Plain Paper Tray Accessory Auto Two-Sided Print Accessory with Small Paper Tray Follow these steps to select a paper source: 1. Open the Printer Properties dialog box. 2. Click the Printing Shortcuts tab or the Paper/Quality tab. 3. Find the appropriate drop-down list: Tab Printing Shortcuts Paper/Quality Drop-down list Paper source Source is Select any other print settings that you want, and then click OK. 4. Select one of the following options in the drop-down list: - Upper tray: prints from the In tray. - Lower tray: prints from the 250-Sheet Plain Paper Tray Accessory. - Upper, then lower: prints from the In tray. If the In tray is empty, the printer prints from the 250-Sheet Plain Paper Tray Accessory. - Lower, then upper: prints from the 250-Sheet Plain Paper Tray Accessory. If the accessory is empty, the printer prints from the In tray. - Rear tray: prints from the Auto Two-Sided Print Accessory with Small Paper Tray. This option is displayed only if the accessory is attached to the printer. Print task quick sets Use print task quick sets to print with or save print settings that you use often. If you frequently print on envelopes, for example, you can create a print task that contains the paper size, print quality, and orientation setting that you normally use for envelopes. After creating the print task, simply select it when printing on envelopes rather than setting each of the print settings separately. Note The printer software can save up to 25 print task quick sets. Create a print task or use the specially designed print tasks that are available in the Print Task Quick Sets drop-down list. Use a print task quick set Follow these steps to use a print task quick set: 1. Open the Printer Properties dialog box. A Print Task Quick Sets drop-down list is displayed at the top of most tabs. 2. Go to Print Task Quick Sets on any tab where it is displayed. 3. In the drop-down list, click the print task that you want to use. User's guide 97
-
 1
1 -
2
-
3
-
4
-
5
-
6
-
7
-
8
-
9
-
10
-
11
-
12
-
13
-
14
-
15
-
16
-
17
-
18
-
19
-
20
-
21
-
22
-
23
-
24
-
25
-
26
-
27
-
28
-
29
-
30
-
31
-
32
-
33
-
34
-
35
-
36
-
37
-
38
-
39
-
40
-
41
-
42
-
43
-
44
-
45
-
46
-
47
-
48
-
49
-
50
-
51
-
52
-
53
-
54
-
55
-
56
-
57
-
58
-
59
-
60
-
61
-
62
-
63
-
64
-
65
-
66
-
67
-
68
-
69
-
70
-
71
-
72
-
73
-
74
-
75
-
76
-
77
-
78
-
79
-
80
-
81
-
82
-
83
-
84
-
85
-
86
-
87
-
88
-
89
-
90
-
91
-
92
-
93
-
 94
94 -
 95
95 -
 96
96 -
 97
97 -
 98
98 -
 99
99 -
 100
100 -
 101
101 -
 102
102 -
 103
103 -
 104
104 -
105
-
106
-
107
-
108
-
109
-
110
-
111
-
112
-
113
-
114
-
115
-
116
-
117
-
118
-
119
-
120
-
121
-
122
-
123
-
124
-
125
-
126
-
127
-
128
-
129
-
130
-
131
-
132
-
133
-
134
-
135
-
136
-
137
-
138
-
139
-
140
-
141
-
142
-
143
-
144
-
145
-
146
-
147
-
148
-
149
-
150
-
151
-
152
-
153
-
154
-
155
-
156
-
157
-
158
-
159
-
160
-
161
-
162
-
163
-
164
-
165
-
166
-
167
-
168
-
169
-
170
-
171
-
172
-
173
-
174
-
175
-
176
-
177
-
178
-
179
-
180
-
181
-
182
 |
 |