HP FAX-750 HP Fax 700/750 - (English) User Guide - Page 19
Setting up the fax number and name
 |
View all HP FAX-750 manuals
Add to My Manuals
Save this manual to your list of manuals |
Page 19 highlights
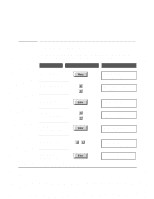
` Setting up the fax number and name These instructions show you in detail how to set the number and name of your fax machine that will print on each fax you send. To do this, you will use menus, buttons and the keypad on the front panel. There are several ways to use buttons and keys with the HP LearnFAST User Interface. The instructions in this guide show you one, easy method. Follow the instructions below by first reading the text in the Do This column, then pressing the buttons and keys in the Using These Buttons column. Check to see that the display shows what you see in the To Display column. If you want to stop and start over, press the Stop button. Do This Using These Buttons To Display Display the Menu Press the Menu button Menu Options (1-8) 1:Scan & Send When you display the menu, there are 8 options available. Press the down arrow to browse down to 6: Settings. If you pass it, press the up arrow. Choose Settings Press Enter. Note that the display has changed. Menu Options (1-8) 6:Settings Settings (1-18) 01:Date & Time Browse to 02: Fax Number & Name Choose 02: Fax Number & Name Press Enter. Note that the display has changed. Continued on next page Settings(01-18) 02:Fax Number & Name Number for this fax 14
-
 1
1 -
2
-
3
-
4
-
5
-
6
-
7
-
8
-
9
-
10
-
11
-
12
-
13
-
 14
14 -
 15
15 -
 16
16 -
 17
17 -
 18
18 -
 19
19 -
 20
20 -
 21
21 -
 22
22 -
 23
23 -
 24
24 -
25
-
26
-
27
-
28
-
29
-
30
-
31
-
32
-
33
-
34
-
35
-
36
-
37
-
38
-
39
-
40
-
41
-
42
-
43
-
44
-
45
-
46
-
47
-
48
-
49
-
50
-
51
-
52
-
53
-
54
-
55
-
56
-
57
-
58
-
59
-
60
-
61
-
62
-
63
-
64
-
65
-
66
-
67
-
68
-
69
-
70
-
71
-
72
-
73
-
74
-
75
-
76
-
77
-
78
-
79
-
80
-
81
-
82
-
83
-
84
-
85
-
86
-
87
-
88
-
89
-
90
-
91
-
92
 |
 |