HP Integrity Superdome 2 8/16 HP Smart Update Manager 5.0 User Guide - Page 30
Generate and View Reports, Generate a Report, View a Report
 |
View all HP Integrity Superdome 2 8/16 manuals
Add to My Manuals
Save this manual to your list of manuals |
Page 30 highlights
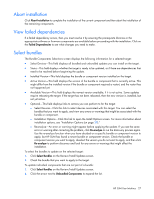
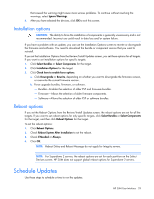
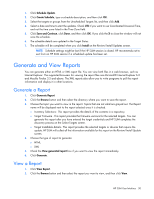
1. Click Schedule Update. 2. Click Create Schedule, type a schedule description, and then click OK. 3. Select the targets or groups from the Unscheduled Targets list, and then click Add. 4. Select a date and time to start the updates. Check UTC if you want to use Coordinated Universal Time, and not the time zone listed in the Time Zone field. 5. Click Save and Continue, click Done, and then click OK. If you click the X to close the window will not save the schedule. 6. The schedule details are updated in the Target Status. 7. The schedule will be completed when you click Install on the Review/Install Updates screen. NOTE: Schedule settings might be lost if the HP SUM session is closed. HP recommends not to exit from an HP SUM session if a scheduled update has been set. Generate and View Reports You can generate either an HTML or XML report file. You can view both files in a web browser, such as Internet Explorer. The supported browsers for viewing the report files are Microsoft® Internet Explorer 6.0 and Mozilla Firefox 3.5 and above. The XML reports also allow you to write programs to pull the report information and display it in other locations. Generate a Report 1. Click Generate Report. 2. Click the Browse button and then select the directory where you want to save the report. 3. Choose the topic you want to view in the report. Topics that are not valid are grayed out. The Report name will be displayed next to the report selected once it is checked. o Inventory Selections - This report provides the details of the contents in a repository. o Target Firmware - This report provides the firmware versions for the selected targets. You can generate this report after you have entered the target credentials and HP SUM completes the discovery process on the Select Targets screen. o Target Installable details - This report provides the selected targets or devices that require the update. HP SUM will collect all the information available for this report on the Review/Install Update screen. 4. Choose the type of report to generate: o HTML o XML 5. Check the View generated report box if you want to view the report immediately. 6. Click Generate. View a Report 1. Click View Report. 2. Click the Browse button and then select the report you want to view, and then click View. HP SUM User Interface 30
-
 1
1 -
2
-
3
-
4
-
5
-
6
-
7
-
8
-
9
-
10
-
11
-
12
-
13
-
14
-
15
-
16
-
17
-
18
-
19
-
20
-
21
-
22
-
23
-
24
-
 25
25 -
 26
26 -
 27
27 -
 28
28 -
 29
29 -
 30
30 -
 31
31 -
 32
32 -
 33
33 -
 34
34 -
 35
35 -
36
-
37
-
38
-
39
-
40
-
41
-
42
-
43
-
44
-
45
-
46
-
47
-
48
-
49
-
50
-
51
-
52
-
53
-
54
-
55
-
56
-
57
-
58
-
59
-
60
-
61
-
62
-
63
-
64
-
65
-
66
-
67
-
68
-
69
-
70
-
71
-
72
-
73
-
74
-
75
-
76
-
77
-
78
-
79
-
80
-
81
-
82
 |
 |