HP Integrity Superdome 2 8/16 HP Smart Update Manager 5.0 User Guide - Page 70
Troubleshooting HP Smart Update Manager in IPv6 networks
 |
View all HP Integrity Superdome 2 8/16 manuals
Add to My Manuals
Save this manual to your list of manuals |
Page 70 highlights
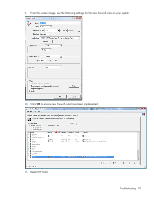
Troubleshooting HP Smart Update Manager in IPv6 networks If HP Smart Update Manager cannot connect to the remote server, you might receive a Discovery Failed error. Discovery failures can be caused by third-party storage, failure to access the remote target server, and an inability to access system resources. For IPv6 networks, host discovery failures can be caused by the incorrect configuration of the IPv6 network. Troubleshooting HP Smart Update Manager in IPv6 Windows Server 2003 environment To validate that the IPv6 network is configured correctly for HP Smart Update Manager support, you must verify the following based on your operating system version. • Validate that the addresses are site-local. Site-local addresses normally start with "FEC0:". Global and link-local IPv6 addresses are not supported when the remote target is Windows Server® 2003. • Validate that you can ping the remote target server. With Windows® operating systems, you can still use the ping command to ping IPv6 addresses: ping . • Ensure you can ping the IPv6 loopback address: ping ::1. • Use the DNS hostname instead of IPv6 address to ensure the address is correct. • Ensure you have installed the IPv6 protocol. It is not installed by default in Windows Server® 2003. Be sure to reboot the server after installing the protocol to ensure addresses are properly obtained. • Verify that you can connect to the admin$ share using the credentials within HP Smart Update Manager by issuing the following command at a console prompt: net use * \\.ipv6-literal.net\admin$ /user: net use * \\fec0::2.ipv6-literal.net\admin$ /user:administrator You might need to provide the password if you are using a user name that is not the same as you used to log in to the local system. All network shares require the use of the .ipv6-literal.net name string to be properly configured by Windows®. NOTE: You do not need to use the .ipv6-literal.net suffix when entering IPv6 address into the HP Smart Update Manager user interface or when passing IPv6 address using command line parameters to HP Smart Update Manager. After you validate that you can access the admin$ share on the remote target server, HP Smart Update Manager works unless other network or hardware issues exist. • Ensure you have made the registry change on remote target servers as mentioned in the HP Smart Update Manager Usage in a Windows Server® 2003 IPv6 environment. • Move back to an IPv4 network address to ensure HP Smart Update Manager properly finds the remote target server without any issues. You can always copy HP Smart Update Manager to the target servers and execute using the local installation method. Troubleshooting 70
-
 1
1 -
2
-
3
-
4
-
5
-
6
-
7
-
8
-
9
-
10
-
11
-
12
-
13
-
14
-
15
-
16
-
17
-
18
-
19
-
20
-
21
-
22
-
23
-
24
-
25
-
26
-
27
-
28
-
29
-
30
-
31
-
32
-
33
-
34
-
35
-
36
-
37
-
38
-
39
-
40
-
41
-
42
-
43
-
44
-
45
-
46
-
47
-
48
-
49
-
50
-
51
-
52
-
53
-
54
-
55
-
56
-
57
-
58
-
59
-
60
-
61
-
62
-
63
-
64
-
 65
65 -
 66
66 -
 67
67 -
 68
68 -
 69
69 -
 70
70 -
 71
71 -
 72
72 -
 73
73 -
 74
74 -
 75
75 -
76
-
77
-
78
-
79
-
80
-
81
-
82
 |
 |
