HP LaserJet Pro CP1525 HP LaserJet Pro CP1520 - User Guide - Page 51
Connect the product to a wireless network using WPS
 |
View all HP LaserJet Pro CP1525 manuals
Add to My Manuals
Save this manual to your list of manuals |
Page 51 highlights
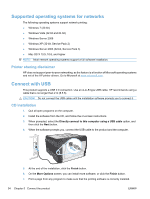
Connect the product to a wireless network using WPS If your wireless router supports Wi-Fi Protected Setup (WPS), this is the simplest way to set up the product on a wireless network. 1. Press the WPS button on your wireless router. 2. Press and hold the Wireless button on the product control panel for two seconds. Release the button when the wireless light starts blinking. 3. Wait up to two minutes while the product establishes a network connection with the wireless router. NOTE: If this method is not successful, try using the wireless network using USB cable method. Connect the product to a wireless network using WPS by using the control panel menus If your wireless router supports Wi-Fi Protected Setup (WPS), this is the simplest way to set up the product on a wireless network. 1. On the front of the product, press the Wireless button. Look at the control panel display to see if the Wireless Menu item has opened. If it has not opened, complete these steps: a. On the control panel, press the OK button, and select the Network Setup menu. b. Select the Wireless Menu item. 2. Select the Wi-Fi Protected Setup item. 3. Use one of these methods to complete the setup: ● Pushbutton: Select the Pushbutton option and follow the instructions on the control panel. Establishing the wireless connection can take a few minutes. ● PIN: Select the Generate PIN option. The product generates a unique PIN, which you must type into the wireless router's setup screen. Establishing the wireless connection can take a few minutes. NOTE: If this method is not successful, try using the wireless network using a USB cable method. Connect the product to a wireless network using a USB cable If your wireless router does not support WiFi-Protected Setup (WPS), use this method to set up the product on a wireless network. Using a USB cable to transfer settings makes setting up a wireless connection easier. After the setup is complete, you can disconnect the USB cable and use the wireless connection. 1. Insert the software CD into the computer CD tray. 2. Follow the on-screen instructions. When prompted, select the Connect through a wireless network option. Connect the USB cable to the product when prompted. CAUTION: Do not connect the USB cable until the installation program prompts you. 3. When the installation is complete, print a configuration page to make sure that the product has a SSID name. 4. When installation is complete, disconnect the USB cable. ENWW Connect to a network 37
-
 1
1 -
2
-
3
-
4
-
5
-
6
-
7
-
8
-
9
-
10
-
11
-
12
-
13
-
14
-
15
-
16
-
17
-
18
-
19
-
20
-
21
-
22
-
23
-
24
-
25
-
26
-
27
-
28
-
29
-
30
-
31
-
32
-
33
-
34
-
35
-
36
-
37
-
38
-
39
-
40
-
41
-
42
-
43
-
44
-
45
-
 46
46 -
 47
47 -
 48
48 -
 49
49 -
 50
50 -
 51
51 -
 52
52 -
 53
53 -
 54
54 -
 55
55 -
 56
56 -
57
-
58
-
59
-
60
-
61
-
62
-
63
-
64
-
65
-
66
-
67
-
68
-
69
-
70
-
71
-
72
-
73
-
74
-
75
-
76
-
77
-
78
-
79
-
80
-
81
-
82
-
83
-
84
-
85
-
86
-
87
-
88
-
89
-
90
-
91
-
92
-
93
-
94
-
95
-
96
-
97
-
98
-
99
-
100
-
101
-
102
-
103
-
104
-
105
-
106
-
107
-
108
-
109
-
110
-
111
-
112
-
113
-
114
-
115
-
116
-
117
-
118
-
119
-
120
-
121
-
122
-
123
-
124
-
125
-
126
-
127
-
128
-
129
-
130
-
131
-
132
-
133
-
134
-
135
-
136
-
137
-
138
-
139
-
140
-
141
-
142
-
143
-
144
-
145
-
146
-
147
-
148
-
149
-
150
-
151
-
152
-
153
-
154
-
155
-
156
-
157
-
158
-
159
-
160
-
161
-
162
-
163
-
164
-
165
-
166
-
167
-
168
-
169
-
170
-
171
-
172
-
173
-
174
-
175
-
176
-
177
-
178
-
179
-
180
-
181
-
182
-
183
-
184
-
185
-
186
-
187
-
188
-
189
-
190
-
191
-
192
-
193
-
194
-
195
-
196
-
197
-
198
-
199
-
200
-
201
-
202
 |
 |
