HP Officejet 6000 User Guide - Page 115
Clear jams, Clear a jam in the device, To clear a jam, CAUTION
 |
View all HP Officejet 6000 manuals
Add to My Manuals
Save this manual to your list of manuals |
Page 115 highlights
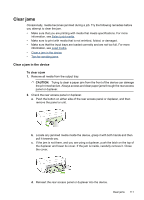
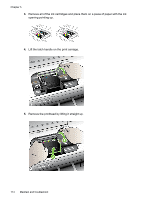
Clear jams Occasionally, media becomes jammed during a job. Try the following remedies before you attempt to clear the jam. • Make sure that you are printing with media that meets specifications. For more information, see Select print media. • Make sure to print with media that is not wrinkled, folded, or damaged. • Make sure that the input trays are loaded correctly and are not too full. For more information, see Load media. • Clear a jam in the device • Tips for avoiding jams Clear a jam in the device To clear a jam 1. Remove all media from the output tray. CAUTION: Trying to clear a paper jam from the front of the device can damage the print mechanism. Always access and clear paper jams through the rear access panel or duplexer. 2. Check the rear access panel or duplexer. a. Push the button on either side of the rear access panel or duplexer, and then remove the panel or unit. b. Locate any jammed media inside the device, grasp it with both hands and then pull it towards you. c. If the jam is not there, and you are using a duplexer, push the latch on the top of the duplexer and lower its cover. If the jam is inside, carefully remove it. Close the cover. d. Reinsert the rear access panel or duplexer into the device. Clear jams 111
-
 1
1 -
2
-
3
-
4
-
5
-
6
-
7
-
8
-
9
-
10
-
11
-
12
-
13
-
14
-
15
-
16
-
17
-
18
-
19
-
20
-
21
-
22
-
23
-
24
-
25
-
26
-
27
-
28
-
29
-
30
-
31
-
32
-
33
-
34
-
35
-
36
-
37
-
38
-
39
-
40
-
41
-
42
-
43
-
44
-
45
-
46
-
47
-
48
-
49
-
50
-
51
-
52
-
53
-
54
-
55
-
56
-
57
-
58
-
59
-
60
-
61
-
62
-
63
-
64
-
65
-
66
-
67
-
68
-
69
-
70
-
71
-
72
-
73
-
74
-
75
-
76
-
77
-
78
-
79
-
80
-
81
-
82
-
83
-
84
-
85
-
86
-
87
-
88
-
89
-
90
-
91
-
92
-
93
-
94
-
95
-
96
-
97
-
98
-
99
-
100
-
101
-
102
-
103
-
104
-
105
-
106
-
107
-
108
-
109
-
 110
110 -
 111
111 -
 112
112 -
 113
113 -
 114
114 -
 115
115 -
 116
116 -
 117
117 -
 118
118 -
 119
119 -
 120
120 -
121
-
122
-
123
-
124
-
125
-
126
-
127
-
128
-
129
-
130
-
131
-
132
-
133
-
134
-
135
-
136
-
137
-
138
-
139
-
140
-
141
-
142
-
143
-
144
-
145
-
146
-
147
-
148
-
149
-
150
-
151
-
152
-
153
-
154
-
155
-
156
-
157
-
158
-
159
-
160
-
161
-
162
-
163
-
164
-
165
-
166
-
167
-
168
 |
 |
