HP PageWide Pro 452dw User Guide - Page 58
To print from a computer (OS X), Properties, Print
 |
View all HP PageWide Pro 452dw manuals
Add to My Manuals
Save this manual to your list of manuals |
Page 58 highlights
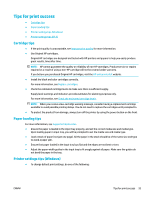
Tab Effects Finishing Color Advanced Description NOTE: If Alternative Letterhead Mode (ALM) is enabled, and you are printing on letterhead, preprinted, or prepunched forms, select Letterhead, Preprinted, or Prepunched as the paper type. For more information, see Load letterhead or preprinted forms . ● Special pages: Includes front and back covers, blank sheets, and preprinted sheets ● Print quality: Includes Professional (for high-quality jobs) and General Office (for everyday jobs) NOTE: You cannot print envelopes in General Office mode. This tab contains settings that temporarily affect the presentation of the print job. You can select from the following options: ● Resizing options: Includes actual size, a percentage of actual, or scaled to a specific media size such as Letter or Envelope #10 ● Watermarks: Includes Confidential and Draft This tab contains settings that influence the output of the print job. You can select from the following options: ● Print on both sides: Includes the option to print with room for binding on the left, right, or neither side ● Pages per sheet: Print more than one page per sheet, with the option to print borders around each page ● Orientation: Includes Portrait and Landscape This tab contains settings for printing in color or grayscale. You can select from the following: ● Print in Grayscale: Print in black only, or high-quality CMYK grayscale (which uses the color cartridges in addition to the black cartridge). ● Color Themes: These options determine how colors are rendered. They include various red- green-blue themes such as in Default, Photo, or Vivid. For more information, see To adjust or manage colors. This tab contains settings that you may use or change infrequently. You can select from the following: ● Copies: Select the number of copies and whether to collate them ● Reverse page order: Prints from the last page of the job to the first page ● Print all text as black: Helps reduce color cartridge usage ● Ink Settings: Use the sliders to select the dry time, saturation level, and black color spread for the print job. For more information, see To adjust or manage colors. 6. Click OK to return to the Properties dialog box. 7. Click OK , and then click Print or click OK in the Print dialog box. NOTE: After printing, remove any special media, such as envelopes or photo paper, from the product. To print from a computer (OS X) These instructions apply to printing on various media including the following: ● Plain paper ● Envelopes ● Brochures 48 Chapter 6 Print ENWW
-
 1
1 -
2
-
3
-
4
-
5
-
6
-
7
-
8
-
9
-
10
-
11
-
12
-
13
-
14
-
15
-
16
-
17
-
18
-
19
-
20
-
21
-
22
-
23
-
24
-
25
-
26
-
27
-
28
-
29
-
30
-
31
-
32
-
33
-
34
-
35
-
36
-
37
-
38
-
39
-
40
-
41
-
42
-
43
-
44
-
45
-
46
-
47
-
48
-
49
-
50
-
51
-
52
-
 53
53 -
 54
54 -
 55
55 -
 56
56 -
 57
57 -
 58
58 -
 59
59 -
 60
60 -
 61
61 -
 62
62 -
 63
63 -
64
-
65
-
66
-
67
-
68
-
69
-
70
-
71
-
72
-
73
-
74
-
75
-
76
-
77
-
78
-
79
-
80
-
81
-
82
-
83
-
84
-
85
-
86
-
87
-
88
-
89
-
90
-
91
-
92
-
93
-
94
-
95
-
96
-
97
-
98
-
99
-
100
-
101
-
102
-
103
-
104
-
105
-
106
-
107
-
108
-
109
-
110
-
111
-
112
-
113
 |
 |
