HP Pavilion zt1200 HP Pavilion Notebook PC zt1200 and xz300 Series - Reference - Page 121
Running advanced tests on specific hardware
 |
View all HP Pavilion zt1200 manuals
Add to My Manuals
Save this manual to your list of manuals |
Page 121 highlights
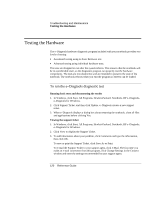
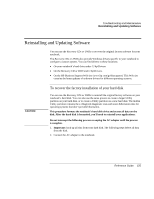
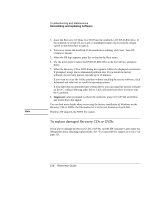
Troubleshooting and Maintenance Testing the Hardware Running advanced tests on specific hardware 1. Restart the notebook: click Start, Turn Off Computer, Restart. 2. When the HP logo appears, press F10 to start the diagnostic test. 3. When the menu appears, press F2 to run e-Diagtools. The first time you run the program, you are prompted to select the language for the program. 4. When the Configuration Description appears, verify the list of detected hardware. 5. Run the basic test. Press F2 to start the basic hardware test. The results appear when the test is complete. 6. Press F2 to open the advanced test screen. 7. Use the arrow keys and ENTER to select the tests that you want to run. Tests are listed only for detected hardware: 8. Press F2 to run the selected tests and add the results to the Support Ticket. 9. Press F12 to run the selected tests in a loop until you press ESC. When running advanced tests in a loop, ESC does not stop all tests immediately. 10. After each run, press F2 to go back to the advanced tests screen, press F4 to view the support ticket, or press F3 to exit. e-Diagtools for Windows can update the version of e-Diagtools on your notebook's hard disk. In e-Diagtools for Windows, use the e-Diagtools menu. If you have trouble running e-Diagtools from the hard disk, you can also run it from the Recovery CD or DVD. Boot from disk 1 and select the diagnostics option. Reference Guide 121
-
 1
1 -
2
-
3
-
4
-
5
-
6
-
7
-
8
-
9
-
10
-
11
-
12
-
13
-
14
-
15
-
16
-
17
-
18
-
19
-
20
-
21
-
22
-
23
-
24
-
25
-
26
-
27
-
28
-
29
-
30
-
31
-
32
-
33
-
34
-
35
-
36
-
37
-
38
-
39
-
40
-
41
-
42
-
43
-
44
-
45
-
46
-
47
-
48
-
49
-
50
-
51
-
52
-
53
-
54
-
55
-
56
-
57
-
58
-
59
-
60
-
61
-
62
-
63
-
64
-
65
-
66
-
67
-
68
-
69
-
70
-
71
-
72
-
73
-
74
-
75
-
76
-
77
-
78
-
79
-
80
-
81
-
82
-
83
-
84
-
85
-
86
-
87
-
88
-
89
-
90
-
91
-
92
-
93
-
94
-
95
-
96
-
97
-
98
-
99
-
100
-
101
-
102
-
103
-
104
-
105
-
106
-
107
-
108
-
109
-
110
-
111
-
112
-
113
-
114
-
115
-
 116
116 -
 117
117 -
 118
118 -
 119
119 -
 120
120 -
 121
121 -
 122
122 -
 123
123 -
 124
124 -
 125
125 -
 126
126 -
127
-
128
-
129
-
130
-
131
-
132
-
133
-
134
-
135
-
136
-
137
-
138
-
139
-
140
-
141
-
142
-
143
-
144
-
145
-
146
-
147
-
148
-
149
-
150
-
151
-
152
-
153
-
154
-
155
-
156
-
157
-
158
-
159
-
160
 |
 |