HP Pavilion zt1200 HP Pavilion Notebook PC zt1200 and xz300 Series - Reference - Page 94
s case, and fit the panel
 |
View all HP Pavilion zt1200 manuals
Add to My Manuals
Save this manual to your list of manuals |
Page 94 highlights
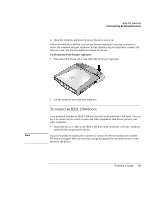
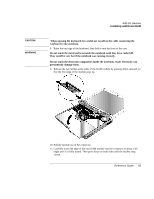
Add-On Devices Installing Additional RAM 12. Move the keyboard back into position. Slide its front edge into the notebook's case, then lower the top of the keyboard into place. 13. Retighten the three screws along the top of the keyboard. 14. Make sure the cable is securely connected to the plastic panel. If needed, press the connector into its socket until it clicks into place. 15. Bend the center of the panel upward slightly, insert the tabs on the ends of the panel into the slots in the notebook's case, and fit the panel's hinge covers over the hinges. Gently press the panel into place. 16. Reinstall the screws in the backs of the display hinge covers. 17. Reinstall the battery. 94 Reference Guide
-
 1
1 -
2
-
3
-
4
-
5
-
6
-
7
-
8
-
9
-
10
-
11
-
12
-
13
-
14
-
15
-
16
-
17
-
18
-
19
-
20
-
21
-
22
-
23
-
24
-
25
-
26
-
27
-
28
-
29
-
30
-
31
-
32
-
33
-
34
-
35
-
36
-
37
-
38
-
39
-
40
-
41
-
42
-
43
-
44
-
45
-
46
-
47
-
48
-
49
-
50
-
51
-
52
-
53
-
54
-
55
-
56
-
57
-
58
-
59
-
60
-
61
-
62
-
63
-
64
-
65
-
66
-
67
-
68
-
69
-
70
-
71
-
72
-
73
-
74
-
75
-
76
-
77
-
78
-
79
-
80
-
81
-
82
-
83
-
84
-
85
-
86
-
87
-
88
-
 89
89 -
 90
90 -
 91
91 -
 92
92 -
 93
93 -
 94
94 -
 95
95 -
 96
96 -
 97
97 -
 98
98 -
 99
99 -
100
-
101
-
102
-
103
-
104
-
105
-
106
-
107
-
108
-
109
-
110
-
111
-
112
-
113
-
114
-
115
-
116
-
117
-
118
-
119
-
120
-
121
-
122
-
123
-
124
-
125
-
126
-
127
-
128
-
129
-
130
-
131
-
132
-
133
-
134
-
135
-
136
-
137
-
138
-
139
-
140
-
141
-
142
-
143
-
144
-
145
-
146
-
147
-
148
-
149
-
150
-
151
-
152
-
153
-
154
-
155
-
156
-
157
-
158
-
159
-
160
 |
 |

Add-On Devices
Installing Additional RAM
94
Reference Guide
12. Move the keyboard back into position. Slide its front edge into the notebook
’
s case,
then lower the top of the keyboard into place.
13. Retighten the three screws along the top of the keyboard.
14. Make sure the cable is securely connected to the plastic panel. If needed, press the
connector into its socket until it clicks into place.
15. Bend the center of the panel upward slightly, insert the tabs on the ends of the panel
into the slots in the notebook
’
s case, and fit the panel
’
s hinge covers over the hinges.
Gently press the panel into place.
16. Reinstall the screws in the backs of the display hinge covers.
17. Reinstall the battery.