HP Photosmart C4200 Full User Guide - Page 137
for information on calling for technical support., covering the ink nozzles
 |
View all HP Photosmart C4200 manuals
Add to My Manuals
Save this manual to your list of manuals |
Page 137 highlights
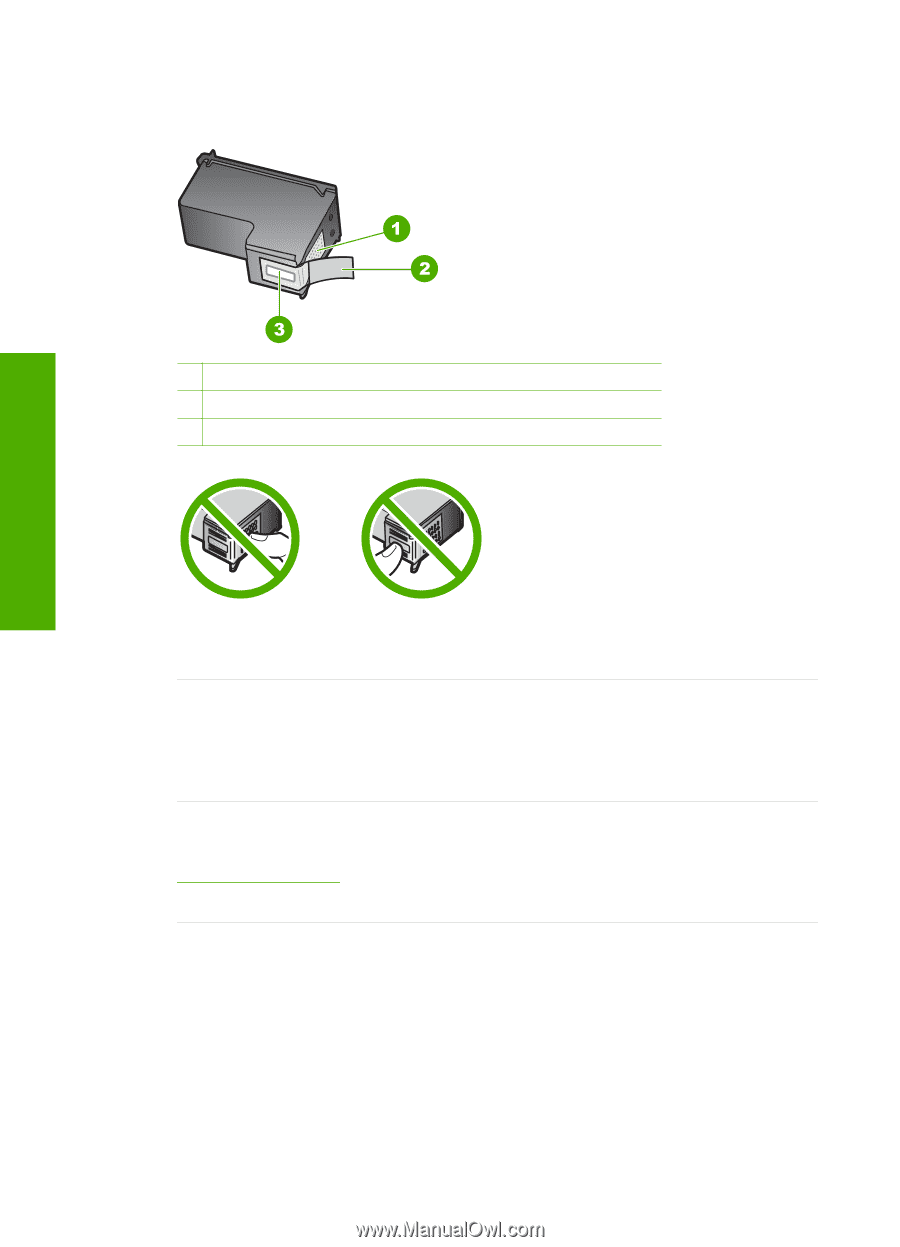
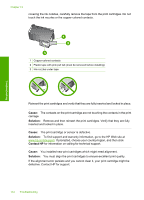
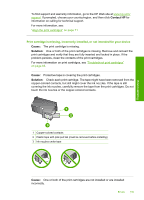
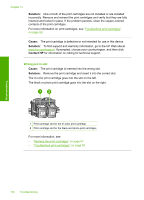
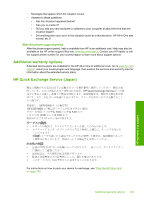
Chapter 13 covering the ink nozzles, carefully remove the tape from the print cartridges. Do not touch the ink nozzles or the copper-colored contacts. Troubleshooting 1 Copper-colored contacts 2 Plastic tape with pink pull tab (must be removed before installing) 3 Ink nozzles under tape Reinsert the print cartridges and verify that they are fully inserted and locked in place. Cause: The contacts on the print cartridge are not touching the contacts in the print carriage. Solution: Remove and then reinsert the print cartridges. Verify that they are fully inserted and locked in place. Cause: The print cartridge or sensor is defective. Solution: To find support and warranty information, go to the HP Web site at www.hp.com/support. If prompted, choose your country/region, and then click Contact HP for information on calling for technical support. Cause: You installed new print cartridges which might need alignment. Solution: You must align the print cartridges to ensure excellent print quality. If the alignment error persists and you cannot clear it, your print cartridge might be defective. Contact HP for support. 134 Troubleshooting
-
 1
1 -
2
-
3
-
4
-
5
-
6
-
7
-
8
-
9
-
10
-
11
-
12
-
13
-
14
-
15
-
16
-
17
-
18
-
19
-
20
-
21
-
22
-
23
-
24
-
25
-
26
-
27
-
28
-
29
-
30
-
31
-
32
-
33
-
34
-
35
-
36
-
37
-
38
-
39
-
40
-
41
-
42
-
43
-
44
-
45
-
46
-
47
-
48
-
49
-
50
-
51
-
52
-
53
-
54
-
55
-
56
-
57
-
58
-
59
-
60
-
61
-
62
-
63
-
64
-
65
-
66
-
67
-
68
-
69
-
70
-
71
-
72
-
73
-
74
-
75
-
76
-
77
-
78
-
79
-
80
-
81
-
82
-
83
-
84
-
85
-
86
-
87
-
88
-
89
-
90
-
91
-
92
-
93
-
94
-
95
-
96
-
97
-
98
-
99
-
100
-
101
-
102
-
103
-
104
-
105
-
106
-
107
-
108
-
109
-
110
-
111
-
112
-
113
-
114
-
115
-
116
-
117
-
118
-
119
-
120
-
121
-
122
-
123
-
124
-
125
-
126
-
127
-
128
-
129
-
130
-
131
-
 132
132 -
 133
133 -
 134
134 -
 135
135 -
 136
136 -
 137
137 -
 138
138 -
 139
139 -
 140
140 -
 141
141 -
 142
142 -
143
-
144
-
145
-
146
-
147
-
148
-
149
-
150
-
151
-
152
-
153
-
154
-
155
 |
 |