HP Photosmart C5300 User Guide - Page 63
Print using Maximum dpi, HP Real Life Technologies RTL
 |
View all HP Photosmart C5300 manuals
Add to My Manuals
Save this manual to your list of manuals |
Page 63 highlights
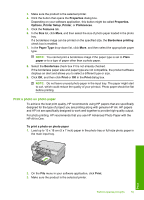
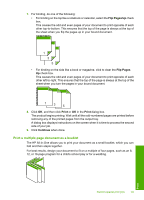
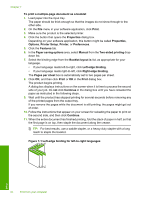
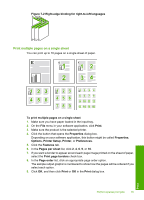
Chapter 7 4. Click the button that opens the Properties dialog box. Depending on your software application, this button might be called Properties, Options, Printer Setup, Printer, or Preferences. 5. Click the Features tab. 6. In the Basic Options area, from the Paper Type drop-down list, select More. Then, select the appropriate photo paper type. 7. In the Resizing Options area, from the Size drop-down list, select More. Then, select the appropriate paper size. If the paper size and paper type are not compatible, the printer software displays an alert and allows you to select a different type or size. 8. In the Basic Options area, select a high print quality, such as Best, from the Print Quality drop-down list. NOTE: To achieve the highest dpi resolution, you can use the Maximum dpi setting with supported types of photo paper. If Maximum dpi is not listed in the Print quality drop-down list, you can enable it from the Advanced tab. For more information, see "Print using Maximum dpi" on page 60. 9. In the HP Real Life Technologies (RTL) area, click the Photo fix drop-down list and select from the following options: • Off: applies no HP Real Life Technologies to the image. • Basic: enhances low-resolution images; moderately adjusts image sharpness. • Full: automatically adjusts brightness, contrast, and sharpness; enhances lowresolution images; automatically removes red eye coloring in the photo. TIP: You can remove red-eye coloring in the photo when using the Off or Basic mode by selecting the Remove red eye check box. 10. Click OK to return to the Properties dialog box. 11. (Optional) If you want to print the photo in black and white, click the Color tab and select the Print in grayscale check box. From the drop-down list, select one of the following options: • High Quality: uses all the available colors to print your photo in grayscale. This creates smooth and natural shades of gray. • Black Ink Only: uses black ink to print your photo in grayscale. The gray shading is created by varying patterns of black dots, which might result in a grainy image. 12. Click OK, and then click Print or OK in the Print dialog box. NOTE: Do not leave unused photo paper in the input tray. The paper might start to curl, which could reduce the quality of your printout. Photo paper should be flat before printing. Print using Maximum dpi Use maximum dpi mode to print high-quality, sharp images. To get the most benefit from maximum dpi mode, use it to print high-quality images such as digital photographs. When you select the maximum dpi setting, the printer software Print 60 Print from your computer
-
 1
1 -
2
-
3
-
4
-
5
-
6
-
7
-
8
-
9
-
10
-
11
-
12
-
13
-
14
-
15
-
16
-
17
-
18
-
19
-
20
-
21
-
22
-
23
-
24
-
25
-
26
-
27
-
28
-
29
-
30
-
31
-
32
-
33
-
34
-
35
-
36
-
37
-
38
-
39
-
40
-
41
-
42
-
43
-
44
-
45
-
46
-
47
-
48
-
49
-
50
-
51
-
52
-
53
-
54
-
55
-
56
-
57
-
 58
58 -
 59
59 -
 60
60 -
 61
61 -
 62
62 -
 63
63 -
 64
64 -
 65
65 -
 66
66 -
 67
67 -
 68
68 -
69
-
70
-
71
-
72
-
73
-
74
-
75
-
76
-
77
-
78
-
79
-
80
-
81
-
82
-
83
-
84
-
85
-
86
-
87
-
88
-
89
-
90
-
91
-
92
-
93
-
94
-
95
-
96
-
97
-
98
-
99
-
100
-
101
-
102
-
103
-
104
-
105
-
106
-
107
-
108
-
109
-
110
-
111
-
112
-
113
-
114
-
115
-
116
-
117
-
118
-
119
-
120
-
121
-
122
-
123
-
124
-
125
-
126
-
127
-
128
-
129
-
130
-
131
-
132
-
133
-
134
-
135
-
136
-
137
-
138
-
139
-
140
-
141
-
142
-
143
-
144
-
145
-
146
-
147
-
148
-
149
-
150
-
151
-
152
-
153
-
154
-
155
-
156
-
157
-
158
-
159
-
160
-
161
-
162
-
163
-
164
-
165
-
166
-
167
-
168
-
169
-
170
-
171
-
172
-
173
-
174
-
175
-
176
-
177
-
178
-
179
-
180
-
181
-
182
-
183
-
184
-
185
-
186
-
187
-
188
-
189
-
190
-
191
-
192
-
193
-
194
-
195
-
196
-
197
-
198
-
199
-
200
-
201
-
202
-
203
-
204
-
205
-
206
-
207
-
208
-
209
-
210
-
211
-
212
-
213
-
214
-
215
-
216
-
217
-
218
-
219
-
220
-
221
-
222
-
223
-
224
-
225
-
226
-
227
-
228
-
229
-
230
-
231
-
232
-
233
-
234
-
235
-
236
-
237
-
238
-
239
-
240
-
241
-
242
-
243
-
244
-
245
-
246
-
247
-
248
-
249
-
250
-
251
-
252
-
253
-
254
-
255
-
256
-
257
-
258
-
259
-
260
-
261
-
262
-
263
-
264
-
265
-
266
-
267
-
268
-
269
-
270
-
271
-
272
-
273
-
274
-
275
-
276
-
277
-
278
-
279
-
280
-
281
-
282
-
283
-
284
-
285
-
286
-
287
-
288
-
289
-
290
-
291
-
292
-
293
-
294
-
295
-
296
-
297
-
298
-
299
-
300
-
301
-
302
-
303
-
304
-
305
 |
 |