HP ProLiant DL380p Configuring Arrays on HP Smart Array Controllers Reference - Page 29
Launching ACU on a local server to con a remote server
 |
View all HP ProLiant DL380p manuals
Add to My Manuals
Save this manual to your list of manuals |
Page 29 highlights
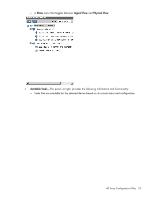
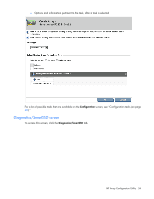
Launching ACU on a local server to configure a remote server 1. On the local server (host), click Start, and then select Programs>HP System Tools>HP Array Configuration Utility>Setup HP Array Configuration Utility. The Execution Mode screen appears. o If Remote Service Mode is selected, continue with step 2. o If Local Application Mode is selected, select Remote Service Mode, reboot the server, and then continue with step 2. 2. On the remote server, open the browser. 3. Enter the following text into the address field of the remote browser (where servername is the name or IP address of the host): http://servername:2301 The login screen for the System Management Homepage opens. 4. Enter your login credentials: o If you are using version 2.0.0 or later of the System Management Homepage, use your operating system user name and password. o If you are using an earlier version of the System Management Homepage, use your WBEM user name and password. The System Management Homepage opens. For more information about the System Management Homepage, see the following: o The HP System Management Homepage web page (http://h18013.www1.hp.com/products/servers/management/agents/index.html) o The HP System Management Homepage Installation Guide on the HP website (http://www.hp.com) 5. Click Array Configuration Utility on the left side of the screen. ACU opens, scans the remote server, and detects controllers. This process can last up to 2 minutes. When controller detection is complete, the controllers are available on the Controller/Device menu. 6. Configure a controller ("Configuring a controller" on page 41). When configuration is complete, continue with the next step. 7. To operate ACU on this server in Local Application mode, do the following: a. Click Start, and then select Programs>HP System Tools>HP Array Configuration Utility>Setup HP Array Configuration Utility. b. When the Execution Mode screen appears, select Local Application Mode. c. Reboot the server. 8. (Optional) To make newly created logical drives available for data storage, use the operating system disk management tools to create partitions and format the drives. Launching ACU on a remote server to configure a local server 1. On the server where ACU is installed, click Start, and then select Programs>HP System Tools>HP Array Configuration Utility>Setup HP Array Configuration Utility. The Execution Mode screen appears. o If Remote Service Mode is selected, continue with step 2. HP Array Configuration Utility 29
-
 1
1 -
2
-
3
-
4
-
5
-
6
-
7
-
8
-
9
-
10
-
11
-
12
-
13
-
14
-
15
-
16
-
17
-
18
-
19
-
20
-
21
-
22
-
23
-
 24
24 -
 25
25 -
 26
26 -
 27
27 -
 28
28 -
 29
29 -
 30
30 -
 31
31 -
 32
32 -
 33
33 -
 34
34 -
35
-
36
-
37
-
38
-
39
-
40
-
41
-
42
-
43
-
44
-
45
-
46
-
47
-
48
-
49
-
50
-
51
-
52
-
53
-
54
-
55
-
56
-
57
-
58
-
59
-
60
-
61
-
62
-
63
-
64
-
65
-
66
-
67
-
68
-
69
-
70
-
71
-
72
-
73
-
74
-
75
-
76
-
77
-
78
-
79
-
80
-
81
-
82
-
83
-
84
-
85
-
86
-
87
-
88
-
89
-
90
-
91
-
92
-
93
-
94
-
95
-
96
-
97
-
98
-
99
-
100
-
101
-
102
-
103
-
104
-
105
-
106
-
107
-
108
-
109
-
110
-
111
-
112
-
113
-
114
-
115
-
116
-
117
-
118
-
119
-
120
-
121
-
122
-
123
-
124
-
125
-
126
-
127
-
128
 |
 |