HP StoreOnce D2D4324 HP StoreOnce VSA Deployment and Configuration Guide (TC45 - Page 37
To prepare and add storage using the StoreOnce CLI, StoreOnce VSA using the StoreOnce CLI command
 |
View all HP StoreOnce D2D4324 manuals
Add to My Manuals
Save this manual to your list of manuals |
Page 37 highlights
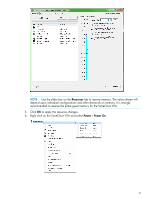
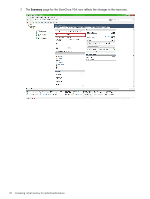
10. The process is now complete for the first virtual disk. To create additional virtual disks, repeat the process. • If powering on the StoreOnce VSA for the first time, the total storage will be made available to the StoreOnce VSA automatically, and the Instant-On license applied. • If the StoreOnce VSA has already been powered on, use StoreOnce CLI commands, as described in the next section, to prepare and add storage to the StoreOnce VSA. Use the StoreOnce CLI command, system show status, as described in the next section to check progress, and when complete, manually reboot the VSA, using the StoreOnce CLI command, system reboot. IMPORTANT: When creating and adding virtual disks to the StoreOnce VSA it is best practice to select the same SCSI controller that was used when the first data vdisk was added. If you select different SCSI controllers for the additional disks, it will be necessary to reboot the StoreOnce VSA (using the StoreOnce CLI command: system reboot.) After reboot, use the StoreOnce CLI commands, as described in the next section, to prepare and add storage to the StoreOnce VSA. To prepare and add storage using the StoreOnce CLI This process prepares and adds all available storage and is required if you create virtual disks after the StoreOnce VSA has been powered on. You are recommended to create as many virtual disks as required before adding them to the StoreOnce VSA . NOTE: There are two StoreOnce CLI commands that may be used to prepare storage; they both carry out the same function: hardware prepare storage and hardware discover storage. 1. Use a ssh session to connect to the StoreOnce VSA Management Console as an Admin user (or use a ssh client application, such as PuTTY, which is freely available from the internet.) ssh @ nl UserName: Admin nl Password: Admin 2. Use the following commands to prepare and add the storage: hardware discover storage hardware add storage 3. While the above commands complete, use the following StoreOnce CLI command to check the current status on the storage addition. In this example, 4 TB is already formatted/configured and 1 TB is currently being added. # system show status Status -----Formatted 4,045.55GB, Adding 1,452GB... Service Sets Status Notes Set 1 Running IMPORTANT: If you add invalid virtual disks of capacity less than or greater than 1 TB the StoreOnce CLI commands, hardware prepare storage and hardware discover storage, will fail with an error and you must remove the invalid virtual disks from the vSphere Client and reboot the StoreOnce VSA for any further storage addition. See Troubleshooting (page 43) for example output if these commands fail. To create virtual disks for the StoreOnce VSA 37
-
 1
1 -
2
-
3
-
4
-
5
-
6
-
7
-
8
-
9
-
10
-
11
-
12
-
13
-
14
-
15
-
16
-
17
-
18
-
19
-
20
-
21
-
22
-
23
-
24
-
25
-
26
-
27
-
28
-
29
-
30
-
31
-
 32
32 -
 33
33 -
 34
34 -
 35
35 -
 36
36 -
 37
37 -
 38
38 -
 39
39 -
 40
40 -
 41
41 -
 42
42 -
43
-
44
-
45
-
46
-
47
-
48
-
49
-
50
-
51
-
52
-
53
-
54
-
55
-
56
-
57
-
58
-
59
 |
 |
