HP Surestore Tape Library Model 2/15 HP DLT Tape Library 15-Slot - (English) U - Page 38
Secured SCSI and Power Cables, Front Access Door, Push the library back into the rack.
 |
View all HP Surestore Tape Library Model 2/15 manuals
Add to My Manuals
Save this manual to your list of manuals |
Page 38 highlights
Figure 2-4 Library Installation Step 6: Connect Library to Host 6. Carefully route the cables down along the back rail. Use a cable tie to secure them to the rail just above the slide mounting bracket. Clip off the ends of all four cable ties. Secured SCSI and Power Cables Figure 2-5 7. Close the back door on the rack. 8. Push the library back into the rack. 9. Open the front access door. Replace the two screws that secure the library to the rack, then relock the door. Front Access Door 2-12
-
 1
1 -
2
-
3
-
4
-
5
-
6
-
7
-
8
-
9
-
10
-
11
-
12
-
13
-
14
-
15
-
16
-
17
-
18
-
19
-
20
-
21
-
22
-
23
-
24
-
25
-
26
-
27
-
28
-
29
-
30
-
31
-
32
-
 33
33 -
 34
34 -
 35
35 -
 36
36 -
 37
37 -
 38
38 -
 39
39 -
 40
40 -
 41
41 -
 42
42 -
 43
43 -
44
-
45
-
46
-
47
-
48
-
49
-
50
-
51
-
52
-
53
-
54
-
55
-
56
-
57
-
58
-
59
-
60
-
61
-
62
-
63
-
64
-
65
-
66
-
67
-
68
-
69
-
70
-
71
-
72
-
73
-
74
-
75
-
76
-
77
-
78
-
79
-
80
-
81
-
82
-
83
-
84
-
85
-
86
-
87
-
88
-
89
-
90
-
91
-
92
-
93
-
94
-
95
-
96
-
97
-
98
-
99
-
100
-
101
-
102
-
103
-
104
-
105
-
106
-
107
-
108
-
109
-
110
-
111
-
112
-
113
-
114
 |
 |

2-12
Library Installation
Step 6: Connect Library to Host
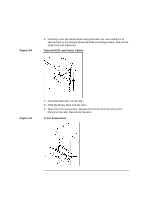
6.
Carefully route the cables down along the back rail. Use a cable tie to
secure them to the rail just above the slide mounting bracket. Clip off the
ends of all four cable ties.
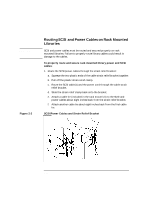
Figure 2-4
Secured SCSI and Power Cables
7.
Close the back door on the rack.
8.
Push the library back into the rack.
9.
Open the front access door. Replace the two screws that secure the
library to the rack, then relock the door.
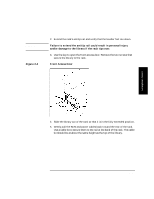
Figure 2-5
Front Access Door