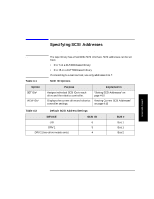
HP Surestore Tape Library Model 2/15 HP DLT Tape Library 15-Slot - (English) U - Page 60
Viewing Current SCSI Address Settings, Setting SCSI Addresses
 |
View all HP Surestore Tape Library Model 2/15 manuals
Add to My Manuals
Save this manual to your list of manuals |
Page 60 highlights
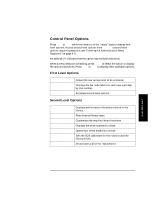
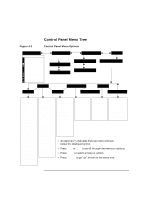
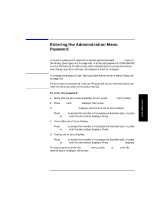
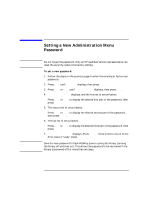
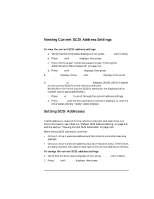
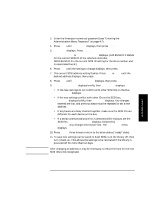
Library Operation Specifying SCSI Addresses Viewing Current SCSI Address Settings 1 2 © ADMIN* © PSWD 000 000 000 © SCSI IDs © VIEW IDs To view the current SCSI address settings: a. Verify that the drive status displays (if not, press CANCEL until it does). b. Press NEXT until ADMIN* displays, then press ENTER. c. Enter the three-part numerical password (see "Entering the Administration Menu Password" on page 4-7). d. Press NEXT until SCSI IDs* displays, then press ENTER. 8. SET IDs* displays. Press NEXT until VIEW IDs* displays, then press ENTER. 9. BUS1 LIB ID# or BUS# DRV * ID * displays. (BUS1 LIB ID # stands for the current SCSI ID of the robotics controller. BUS# DRV # ID # is the current SCSI ID setting for the displayed drive number and its associated BUS#.) Press NEXT or PREV to scroll through the current address settings. a. Press CANCEL until the next operation to perform displays, or until the drive status (library "ready" state) displays. Setting SCSI Addresses 1 2 © ADMIN* © PSWD 000 000 000 © SCSI IDs © SET IDs A SCSI address is required for the robotics controller and each drive. For more information, see Table 4-2, "Default SCSI Address Setting" on page 4-9, and the section "Viewing Current SCSI Addresses" on page 4-10. When setting SCSI addresses, note that: • On bus 1, drive 1 uses one address and the robotics controller uses one address. • On bus 2, drive 2 uses one address (two-drive libraries only). If the drives are daisy-chained, the robotics and each drive use one address on the bus. To change the current SCSI address settings: 1. Verify that the drive status displays (if not, press CANCEL until it does). 2. Press NEXT until ADMIN* displays, then press ENTER. 4-10
-
 1
1 -
2
-
3
-
4
-
5
-
6
-
7
-
8
-
9
-
10
-
11
-
12
-
13
-
14
-
15
-
16
-
17
-
18
-
19
-
20
-
21
-
22
-
23
-
24
-
25
-
26
-
27
-
28
-
29
-
30
-
31
-
32
-
33
-
34
-
35
-
36
-
37
-
38
-
39
-
40
-
41
-
42
-
43
-
44
-
45
-
46
-
47
-
48
-
49
-
50
-
51
-
52
-
53
-
54
-
 55
55 -
 56
56 -
 57
57 -
 58
58 -
 59
59 -
 60
60 -
 61
61 -
 62
62 -
 63
63 -
 64
64 -
 65
65 -
66
-
67
-
68
-
69
-
70
-
71
-
72
-
73
-
74
-
75
-
76
-
77
-
78
-
79
-
80
-
81
-
82
-
83
-
84
-
85
-
86
-
87
-
88
-
89
-
90
-
91
-
92
-
93
-
94
-
95
-
96
-
97
-
98
-
99
-
100
-
101
-
102
-
103
-
104
-
105
-
106
-
107
-
108
-
109
-
110
-
111
-
112
-
113
-
114
 |
 |
