HP Surestore Tape Library Model 2/15 HP DLT Tape Library 15-Slot - (English) U - Page 71
Cleaning the Tape Drives, 2 ADMIN* PSWD 000 000 000 CLEAN DRIVES, REPLACE CLEANING, ADMIN
 |
View all HP Surestore Tape Library Model 2/15 manuals
Add to My Manuals
Save this manual to your list of manuals |
Page 71 highlights
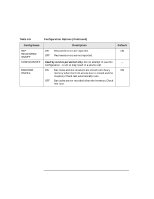
NOTE Library Operation Cleaning the Tape Drives Cleaning the Tape Drives 1 2 © ADMIN* © PSWD 000 000 000 © CLEAN DRIVES* Cleaning the drives, which takes about 5 minutes per drive, requires a special digital linear tape cleaning cartridge. (Typically, cleaning cartridges are light yellow and data cartridges are black, brown, or white. See Appendix A for a list of supplies.) The drive mechanisms do not require scheduled cleanings and should be cleaned only if a "clean drive" status indicator ( C ) displays after the drive number. If the cleaning cartridge needs to be replaced, REPLACE CLEANING displays, and the cleaning cartridge ejects through the mailslot. The software package may manage drive cleaning. To clean one or more of the drives: 1. Verify that the drive status displays (if not, press CANCEL until it does). 2. Make sure all drives are empty ( displays after the drive number). To empty the drives, refer to the documentation for the software package. 3. Press NEXT until ADMIN* displays, then press ENTER. 4. Enter the three-part numerical password (see "Entering the Administration Menu Password" on page 4-7). 5. INFO* displays. Press NEXT until CLEAN DRIVES* displays, then press ENTER. • If the library power has been turned off or the access door has been opened since a cleaning cartridge location was last selected, SET CLEAN CART* displays. Press ENTER. • If the library power has not been turned off or the access door has not been opened since a cleaning cartridge location was last selected, CLN CART LOC # displays (the number of the cleaning cartridge storage slot last selected is flashing.) If the storage slot location is correct, press ENTER. To select a different storage slot location, press NEXT until the correct storage slot location displays, the press ENTER. 4-21 Library Operation
-
 1
1 -
2
-
3
-
4
-
5
-
6
-
7
-
8
-
9
-
10
-
11
-
12
-
13
-
14
-
15
-
16
-
17
-
18
-
19
-
20
-
21
-
22
-
23
-
24
-
25
-
26
-
27
-
28
-
29
-
30
-
31
-
32
-
33
-
34
-
35
-
36
-
37
-
38
-
39
-
40
-
41
-
42
-
43
-
44
-
45
-
46
-
47
-
48
-
49
-
50
-
51
-
52
-
53
-
54
-
55
-
56
-
57
-
58
-
59
-
60
-
61
-
62
-
63
-
64
-
65
-
 66
66 -
 67
67 -
 68
68 -
 69
69 -
 70
70 -
 71
71 -
 72
72 -
 73
73 -
 74
74 -
 75
75 -
 76
76 -
77
-
78
-
79
-
80
-
81
-
82
-
83
-
84
-
85
-
86
-
87
-
88
-
89
-
90
-
91
-
92
-
93
-
94
-
95
-
96
-
97
-
98
-
99
-
100
-
101
-
102
-
103
-
104
-
105
-
106
-
107
-
108
-
109
-
110
-
111
-
112
-
113
-
114
 |
 |
