HP Surestore Tape Library Model 2/15 HP DLT Tape Library 15-Slot - (English) U - Page 95
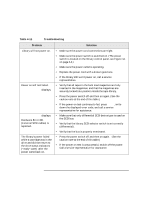
SECURITY ENABLED, TRANSPORT FULL, LOAD ERROR, FAILED, Table 4-11, Troubleshooting Continued, Problem
 |
View all HP Surestore Tape Library Model 2/15 manuals
Add to My Manuals
Save this manual to your list of manuals |
Page 95 highlights
Library Operation Troubleshooting Table 4-11 Troubleshooting (Continued) Problem Solution No display messages appear. • Make sure the power cord is connected. • Make sure the power switch is on. • Power cycle the library. (See the caution note at the end of this table.) • If there is still no display, call a service representative for assistance. An error message is received after bulk loading tape cartridges. • Verify that cartridges are inserted into the magazine in the correct orientation. (See "Loading Cartridges Into the Library" on page 4-13.) • Verify that the correct tape type is used. (See "Choosing Tape Cartridges" on page 3-3.) • If the light bar on the display panel is orange, cycle power to the library and try to load the magazine again when the drive numbers and status indicators are displayed. (See the caution note at the end of this table.) • If SECURITY ENABLED displays, a security option has been set that prevents cartridges from being loaded into or removed from the library. See "Setting Configuration Options" on page 4-24. • If TRANSPORT FULL displays, the cartridge transport mechanism already contains a tape cartridge. Refer to the software package documentation. A service call may be needed. • If a LOAD ERROR or FAILED message still displays, this could indicate a library failure; call a service representative for assistance. Changed drive address but the new address is not recognized by the host. Try rebooting the host computer. Some computers require this for the new address to be recognized. (See the caution note at the end of this table.) Library Operation 4-45
-
 1
1 -
2
-
3
-
4
-
5
-
6
-
7
-
8
-
9
-
10
-
11
-
12
-
13
-
14
-
15
-
16
-
17
-
18
-
19
-
20
-
21
-
22
-
23
-
24
-
25
-
26
-
27
-
28
-
29
-
30
-
31
-
32
-
33
-
34
-
35
-
36
-
37
-
38
-
39
-
40
-
41
-
42
-
43
-
44
-
45
-
46
-
47
-
48
-
49
-
50
-
51
-
52
-
53
-
54
-
55
-
56
-
57
-
58
-
59
-
60
-
61
-
62
-
63
-
64
-
65
-
66
-
67
-
68
-
69
-
70
-
71
-
72
-
73
-
74
-
75
-
76
-
77
-
78
-
79
-
80
-
81
-
82
-
83
-
84
-
85
-
86
-
87
-
88
-
89
-
 90
90 -
 91
91 -
 92
92 -
 93
93 -
 94
94 -
 95
95 -
 96
96 -
 97
97 -
 98
98 -
 99
99 -
 100
100 -
101
-
102
-
103
-
104
-
105
-
106
-
107
-
108
-
109
-
110
-
111
-
112
-
113
-
114
 |
 |
