HP TouchSmart IQ506t Getting Started Guide - Page 11
Removing the Connector Cover, Back of the HP TouchSmart PC, Ethernet LAN - hard drive removal
 |
View all HP TouchSmart IQ506t manuals
Add to My Manuals
Save this manual to your list of manuals |
Page 11 highlights
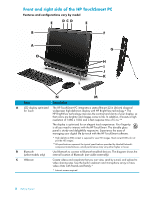
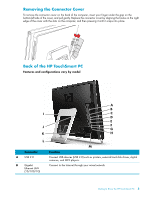
Removing the Connector Cover To remove the connector cover on the back of the computer, insert your finger under the gap on the bottom-left side of the cover, and pull gently. Replace the connector cover by aligning the hooks on the right edge of the cover with the slots on the computer, and then pressing it until it snaps into place. Back of the HP TouchSmart PC Features and configurations vary by model A B I C D E J F G K H L M Connector Function A USB 2.0 Connect USB devices (USB 2.0) such as printers, external hard disk drives, digital cameras, and MP3 players. B Gigabit Ethernet LAN (10/100/1G) Connect to the Internet through your wired network. Getting to Know the HP TouchSmart PC 5
-
 1
1 -
2
-
3
-
4
-
5
-
 6
6 -
 7
7 -
 8
8 -
 9
9 -
 10
10 -
 11
11 -
 12
12 -
 13
13 -
 14
14 -
 15
15 -
 16
16 -
17
-
18
-
19
-
20
-
21
-
22
-
23
-
24
-
25
-
26
-
27
-
28
-
29
-
30
-
31
-
32
-
33
-
34
-
35
-
36
-
37
-
38
-
39
-
40
-
41
-
42
-
43
-
44
-
45
-
46
-
47
-
48
-
49
-
50
-
51
-
52
-
53
-
54
-
55
-
56
-
57
-
58
-
59
-
60
-
61
-
62
-
63
-
64
-
65
-
66
-
67
-
68
-
69
-
70
 |
 |

Getting to Know the HP TouchSmart PC
5
Removing the Connector Cover
To remove the connector cover on the back of the computer, insert your finger under the gap on the
bottom-left side of the cover, and pull gently. Replace the connector cover by aligning the hooks on the right
edge of the cover with the slots on the computer, and then pressing it until it snaps into place.
Back of the HP TouchSmart PC
Features and configurations vary by model
J
K
L
I
M
A
B
C
D
E
F
G
H
Connector
Function
A
USB 2.0
Connect USB devices (USB 2.0) such as printers, external hard disk drives, digital
cameras, and MP3 players.
B
Gigabit
Ethernet LAN
(10/100/1G)
Connect to the Internet through your wired network.