HP Xw4200 HP Workstations xw Series - Setup and Troubleshooting Guide - Page 36
Table 4-11, Self-Test BIST LED located inside - beeps
 |
UPC - 829160426853
View all HP Xw4200 manuals
Add to My Manuals
Save this manual to your list of manuals |
Page 36 highlights
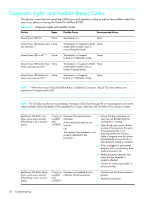
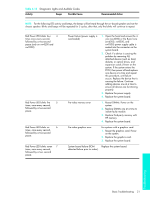
Table 4-11 Troubleshooting General Problems Problem Cause Solution Workstation powered off Processor thermal protection 1. Ensure that the workstation air automatically and the Power LED activated: vents are not blocked and the blinks Red two times, once every A fan may be blocked or not turning. cooling fan is running. second, followed by a two second pause. (On the xw4200 and OR xw9300, two audible beeps will also The heatsink is not properly attached be emitted.) to the processor. 2. Open hood, press power button, and see if the processor fan spins. If the processor fan is not spinning, make sure the fan's cable is plugged onto the system board header. Ensure the fan is fully/properly seated or installed. 3. If fan is plugged in and seated properly, but is not spinning, then replace the processor heatsink assembly. 4. Reseat processor heatsink and verify that fan assembly is properly attached. 5. Contact an authorized reseller or service provider. System does not power on and the LEDs on the front of the workstation are not blinking. System unable to power on. Press and hold the power button for less than 4 seconds. If the hard drive LED turns green, then: 1. Remove the expansion cards one at a time and try holding the power button again for less than 4 seconds. 2. Replace the system board. OR Press and hold the power button for less than 4 seconds. If the hard drive LED does not turn on green then: 1. Check that unit is plugged into a working AC outlet. 2. Open hood and check that the power button harness is properly connected to the system board. 3. Check that both power supply cables are properly connected to the system board. 4. Check the Power Supply Built-InSelf-Test (BIST) LED located inside the power supply (look directly at the rear of the chassis). 5. Replace the system board. 28 Troubleshooting
-
 1
1 -
2
-
3
-
4
-
5
-
6
-
7
-
8
-
9
-
10
-
11
-
12
-
13
-
14
-
15
-
16
-
17
-
18
-
19
-
20
-
21
-
22
-
23
-
24
-
25
-
26
-
27
-
28
-
29
-
30
-
 31
31 -
 32
32 -
 33
33 -
 34
34 -
 35
35 -
 36
36 -
 37
37 -
 38
38 -
 39
39 -
 40
40 -
 41
41 -
42
-
43
-
44
-
45
-
46
 |
 |