HP t530 Hardware Reference Guide - Page 42
Troubleshooting, Activity, Beeps, Possible Cause, Recommended Action
 |
View all HP t530 manuals
Add to My Manuals
Save this manual to your list of manuals |
Page 42 highlights
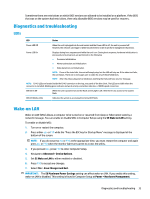
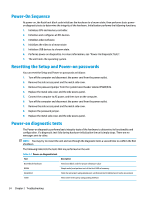
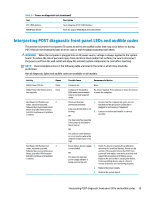
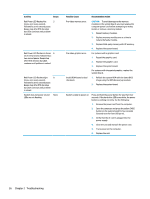
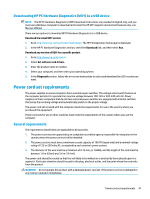
Activity Beeps Red Power LED flashes five 5 times, once every second, followed by a two second pause. Beeps stop after fifth iteration but LEDs continue until problem is solved. Red Power LED flashes six times, 6 once every second, followed by a two second pause. Beeps stop after fifth iteration but LEDs continue until problem is solved. Red Power LED flashes eight 8 times, once every second, followed by a two second pause. Beeps stop after fifth iteration but LEDs continue until problem is solved. System does not power on and LEDs are not flashing. None Possible Cause Pre-video memory error. Pre-video graphics error. Invalid ROM based on bad checksum. Recommended Action CAUTION: To avoid damage to the memory modules or the system board, you must unplug the computer power cord before attempting to reseat, install, or remove a memory module. 1. Reseat memory modules. 2. Replace memory modules one at a time to isolate the faulty module. 3. Replace third-party memory with HP memory. 4. Replace the system board. For systems with a graphics card: 1. Reseat the graphics card. 2. Replace the graphics card. 3. Replace the system board. For systems with integrated graphics, replace the system board. 1. Reflash the system ROM with the latest BIOS image using the BIOS Recovery procedure. 2. Replace the system board. System unable to power on. Press and hold the power button for less than four seconds. If the hard drive LED turns white, the power button is working correctly. Try the following: 1. Remove the power cord from the computer. 2. Open the computer and press the yellow CMOS button on the system board for four seconds (located near the front USB ports). 3. Verify that the AC cord is plugged into the power supply. 4. Close the unit and reattach the power cord. 5. Try to power on the computer. 6. Replace the unit. 36 Chapter 2 Troubleshooting
-
 1
1 -
2
-
3
-
4
-
5
-
6
-
7
-
8
-
9
-
10
-
11
-
12
-
13
-
14
-
15
-
16
-
17
-
18
-
19
-
20
-
21
-
22
-
23
-
24
-
25
-
26
-
27
-
28
-
29
-
30
-
31
-
32
-
33
-
34
-
35
-
36
-
 37
37 -
 38
38 -
 39
39 -
 40
40 -
 41
41 -
 42
42 -
 43
43 -
 44
44 -
 45
45 -
 46
46 -
 47
47 -
48
-
49
-
50
-
51
-
52
-
53
-
54
-
55
-
56
 |
 |
