HP xp7030 User Guide - Page 12
Accessories - replacement lamp
 |
View all HP xp7030 manuals
Add to My Manuals
Save this manual to your list of manuals |
Page 12 highlights
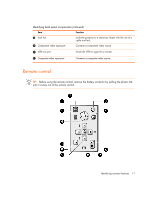
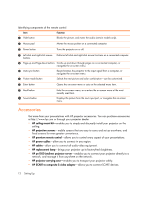
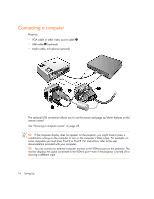
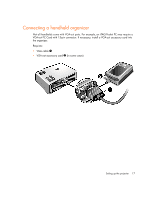
Identifying components of the remote control Item Function 1 Hide button Blanks the picture, and mutes the audio (certain models only). 2 Mouse pad Moves the mouse pointer on a connected computer. 3 Power button Turns the projector on or off. 4 Left-click and right-click mouse Performs left-click and right-click mouse functions on a connected computer. buttons 5 Page-up and Page-down buttons Scrolls up and down through pages on a connected computer, or navigates the on-screen menu. 6 Auto sync button Resynchronizes the projector to the input signal from a computer, or navigates the on-screen menu. 7 Picture mode button Selects the next picture and color combination-can be customized. 8 Enter button Opens the on-screen menu or acts on the selected menu item. 9 Back button : Source button Exits the on-screen menu, or re-enters the on-screen menu at the most recently used item. Displays the picture from the next input port, or navigates the on-screen menu. Accessories Get more from your presentations with HP projector accessories. You can purchase accessories at http://www.hp.com or through your projector dealer. • HP ceiling mount kit-enables you to simply and discreetly install your projector on the ceiling. • HP projection screens-mobile screens that are easy to carry and set up anywhere, and fixed screens for even greater convenience. • HP premium remote control-allows you to control every aspect of your presentations. • HP power cables-allow you to connect in any region. • HP cables-allow you to connect all audio-video equipment. • HP replacement lamp-brings your projector up to factory-fresh brightness. • HP pn1050 Jetdirect projector server-enables you to connect your projector directly to a network, and manage it from anywhere on the network. • HP projector carrying case-enables you to transport your projector safely. • HP SCART to composite S-video adapter-allows you to connect SCART devices. 12 Setting Up
-
 1
1 -
2
-
3
-
4
-
5
-
6
-
 7
7 -
 8
8 -
 9
9 -
 10
10 -
 11
11 -
 12
12 -
 13
13 -
 14
14 -
 15
15 -
 16
16 -
 17
17 -
18
-
19
-
20
-
21
-
22
-
23
-
24
-
25
-
26
-
27
-
28
-
29
-
30
-
31
-
32
-
33
-
34
-
35
-
36
-
37
-
38
-
39
-
40
-
41
-
42
-
43
-
44
-
45
-
46
-
47
-
48
-
49
-
50
-
51
-
52
-
53
-
54
-
55
-
56
-
57
-
58
-
59
-
60
-
61
-
62
-
63
-
64
-
65
-
66
-
67
-
68
-
69
-
70
-
71
-
72
 |
 |