HP xp7030 User Guide - Page 44
Installing Permanently
 |
View all HP xp7030 manuals
Add to My Manuals
Save this manual to your list of manuals |
Page 44 highlights
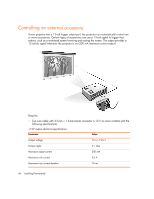
5 Installing Permanently Installing the projector Choosing cables If you are permanently installing the projector or using it with long cables, consider the following suggestions when planning the installation: • Use high-quality cables. Use only video cables that are made with 75-ohm cable and connectors. For high-resolution video, use low-loss video cables. For standard audio, use audio cables that are shielded. • Minimize cable length as much as possible. For video cables longer than 6 m (20 ft), use low-loss cables. For standard audio cables longer than 6 m (20 ft), use 12-gauge wire. • Do not run audio or video cables next to power or network cables. If they must cross, cross them at 90 degrees. • If you are installing cables in walls, use cables with necessary approvals, such as Underwriters Laboratories (UL) approval. • If you are running cables above a dropped ceiling, you must use plenum-rated cables if the space above the ceiling is open to the space above other rooms. You must use plenumrated cables if you are running cables in a duct. • Before installing cables permanently, check the setup with the final cables in the open. Installing on a table This installation is covered in detail in Chapter 1. See "Setting up the projector," for more information. 44 Installing Permanently
-
 1
1 -
2
-
3
-
4
-
5
-
6
-
7
-
8
-
9
-
10
-
11
-
12
-
13
-
14
-
15
-
16
-
17
-
18
-
19
-
20
-
21
-
22
-
23
-
24
-
25
-
26
-
27
-
28
-
29
-
30
-
31
-
32
-
33
-
34
-
35
-
36
-
37
-
38
-
 39
39 -
 40
40 -
 41
41 -
 42
42 -
 43
43 -
 44
44 -
 45
45 -
 46
46 -
 47
47 -
 48
48 -
 49
49 -
50
-
51
-
52
-
53
-
54
-
55
-
56
-
57
-
58
-
59
-
60
-
61
-
62
-
63
-
64
-
65
-
66
-
67
-
68
-
69
-
70
-
71
-
72
 |
 |