Hikvision DS-KH6320-WTE1 Configuration Guide - Page 76
Import and Export Person Information, Get Person Information from Device, Click Take Phone
 |
View all Hikvision DS-KH6320-WTE1 manuals
Add to My Manuals
Save this manual to your list of manuals |
Page 76 highlights
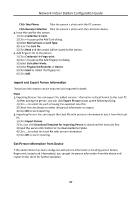
Network Indoor Station Configuration Guide Click Take Phone Take the person's photo with the PC camera. Click Remote Collection Take the person's photo with the collection device. 3. Issue the card for the person. 1) Click Credential → Card . 2) Click + to pop up the Add Card dialog. 3) Select Normal Card as Card Type. 4) Enter the Card No. 5) Click Read and the card(s) will be issued to the person. 4. Add fingerprints to the person. 1) Click Credential → Fingerprint . 2) Click + to pop up the Add Fingerprint dialog. 3) Select Collection Mode. 4) Select Fingerprint Recorder or Device. 5) Click Start to collect the fingerprint. 6) Click Add. Import and Export Person Information The person information can be imported and exported in batch. Steps 1. Exporting Person: You can export the added persons' information in Excel format to the local PC. 1) After adding the person, you can click Export Person to pop up the following dialog. 2) Click ... to select the path of saving the exported Excel file. 3) Check the checkboxes to select the person information to export. 4) Click OK to start exporting. 2. Importing Person: You can import the Excel file with persons information in batch from the local PC. 1) Click Import Person. 2) You can click Download Template for Importing Person to download the template first. 3) Input the person information to the downloaded template. 4) Click ... to select the Excel file with person information. 5) Click OK to start importing. Get Person Information from Device If the added device has been configured with person information (including person details, fingerprint, issued card information), you can get the person information from the device and import to the client for further operation. 67
-
 1
1 -
2
-
3
-
4
-
5
-
6
-
7
-
8
-
9
-
10
-
11
-
12
-
13
-
14
-
15
-
16
-
17
-
18
-
19
-
20
-
21
-
22
-
23
-
24
-
25
-
26
-
27
-
28
-
29
-
30
-
31
-
32
-
33
-
34
-
35
-
36
-
37
-
38
-
39
-
40
-
41
-
42
-
43
-
44
-
45
-
46
-
47
-
48
-
49
-
50
-
51
-
52
-
53
-
54
-
55
-
56
-
57
-
58
-
59
-
60
-
61
-
62
-
63
-
64
-
65
-
66
-
67
-
68
-
69
-
70
-
 71
71 -
 72
72 -
 73
73 -
 74
74 -
 75
75 -
 76
76 -
 77
77 -
 78
78 -
 79
79 -
 80
80 -
 81
81 -
82
 |
 |
