Husqvarna AUTOMOWER SOLAR HYBRID Operation Manual - Page 35
depending on how the working area appears. - test
 |
View all Husqvarna AUTOMOWER SOLAR HYBRID manuals
Add to My Manuals
Save this manual to your list of manuals |
Page 35 highlights
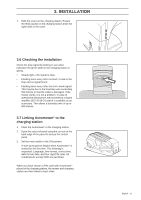
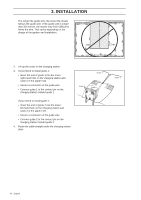
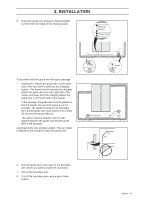
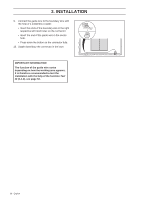
3. INSTALLATION 9. Connect the guide wire to the boundary wire with the help of a solderless coupler: • Insert the ends of the boundary wire in the right respective left-hand holes on the connector. • Insert the end of the guide wire in the centre hole. • Press down the button on the connector fully. 10. Staple down/bury the connector in the lawn. IMPORTANT INFORMATION The function of the guide wire varies depending on how the working area appears. It is therefore recommended to test the installation with the help of the function Test IN (3-2-4), see page 53. 36 - English
-
 1
1 -
2
-
3
-
4
-
5
-
6
-
7
-
8
-
9
-
10
-
11
-
12
-
13
-
14
-
15
-
16
-
17
-
18
-
19
-
20
-
21
-
22
-
23
-
24
-
25
-
26
-
27
-
28
-
29
-
 30
30 -
 31
31 -
 32
32 -
 33
33 -
 34
34 -
 35
35 -
 36
36 -
 37
37 -
 38
38 -
 39
39 -
 40
40 -
41
-
42
-
43
-
44
-
45
-
46
-
47
-
48
-
49
-
50
-
51
-
52
-
53
-
54
-
55
-
56
-
57
-
58
-
59
-
60
-
61
-
62
-
63
-
64
-
65
-
66
-
67
-
68
-
69
-
70
-
71
-
72
-
73
-
74
 |
 |

36 - English
3. INSTALLATION
9.
Connect the guide wire to the boundary wire with
the help of a solderless coupler:
•
Insert the ends of the boundary wire in the right
respective left-hand holes on the connector.
•
Insert the end of the guide wire in the centre
hole.
•
Press down the button on the connector fully.
10.
Staple down/bury the connector in the lawn.
IMPORTANT INFORMATION
The function of the guide wire varies
depending on how the working area appears.
It is therefore recommended to test the
installation with the help of the function
Test
IN (3-2-4)
, see page 53.